|
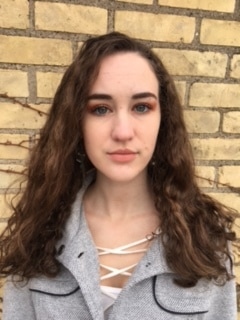
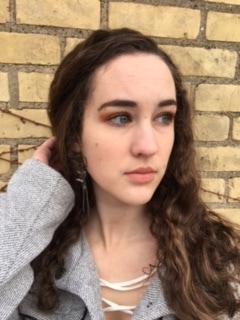
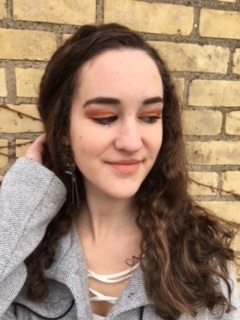
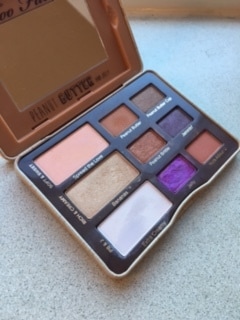
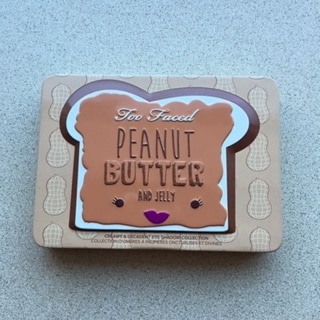
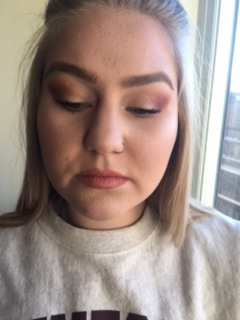
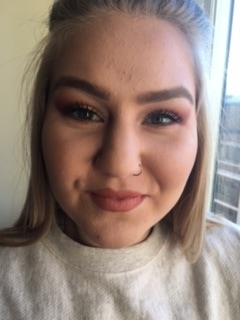
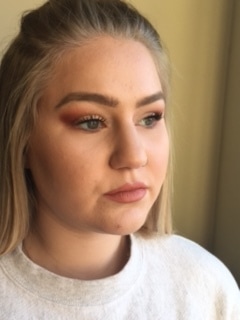
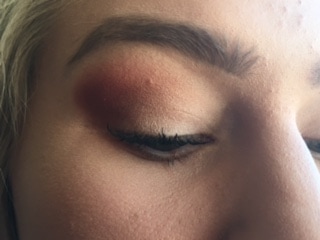
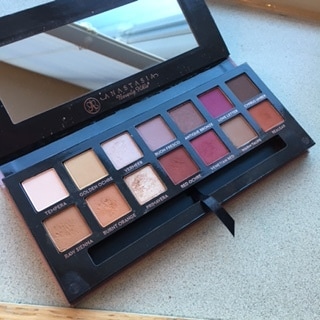
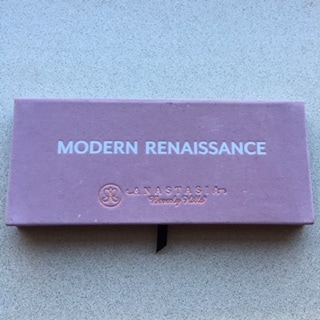
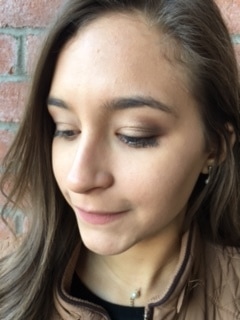
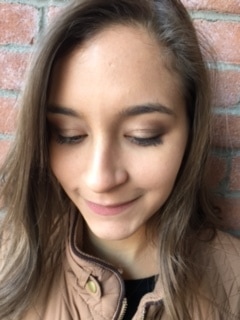
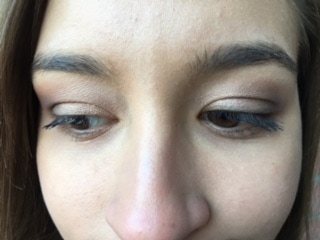
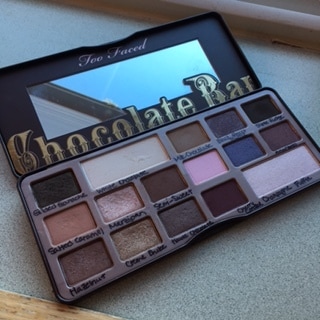
When it comes to my makeup routine, I tend to stick to what I know works for me, but eyeshadow is the one area in makeup that I love to experiment in. I love working with different types of shades and creating looks that can go from simple and classic to dramatic and eye-catching. I was always the girl who did my friends’ makeup for prom, photoshoots, or just for some fun! Over the years I’ve come to know what are some of the most flattering eyeshadow looks for different eye colors. So today, I’m going to share my favorite eyeshadow colors to use on blue, green, and brown eyes. Some of my friends will be featured as models for this post and I will also be giving palette recommendations in case any of you want to recreate these looks. Blue EyesFor all you blue-eyed beauties out there, one of the best color schemes to use that to make the blue in your irises pop is orange. I know orange is an intimidating color to experiment with, but it doesn’t have to be the bright neon orange of which you might be thinking. When it comes to using this color scheme, I suggest that you veer more in the direction of the peach family for something soft and feminine. If you want something much more dramatic go for a burnt orange and copper look. These orange tones really give blue eyes a much more vibrant appearance. 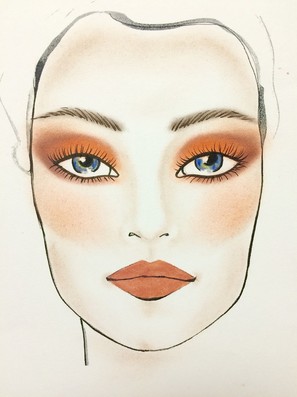 This is the face chart that I used as inspiration for the makeup look that I created for blue eyes! To create this look on my gorgeous friend, Andrea, I used the Too Faced Peanut Butter and Jelly Palette. Andrea has various shades of blue in her irises that make her eye color very unique, almost like a watercolor painting. I decided to go for the more dramatic burnt orange eyeshadow look to bring out the cornflower blue tones in her eyes. I started building the look with Too Faced’s iconic shade, Peanut Butter, in the crease, and added a bit of Nuts About U in the outer corner. I mixed both of the shades Peanut Brittle and Bananas for the eyelid color, and added a light dusting of Peanut Butter on the lower lash line. One thing I will definitely say when it comes to looks like these, is that it’s very easy for it to appear harsh and too concentrated so my advice is to blend a lot. The blending brush is your best friend and it will help create a more cohesive eyeshadow effect! Green EyesTo all my fellow green-eyed lovelies, a universally flattering shade to really enhance your distinct eye color is a shade in the red-plum family. I, myself, have green eyes and personally am a huge fan of burgundy tones because they are so eye-catching and daring, but they are still a more subtle pop of color. If using burgundy on your eyes is intimidating, a great way to make the eyeshadow appear more natural is to add some warm brown tones in the crease to create a more everyday look that isn’t as dramatic. I strongly recommend that when you are shopping for a good makeup palette, get one that has shades that can be used for a look that you might wear just on a day-to-day basis, but also has shades that can add some drama for a night out with your friends. 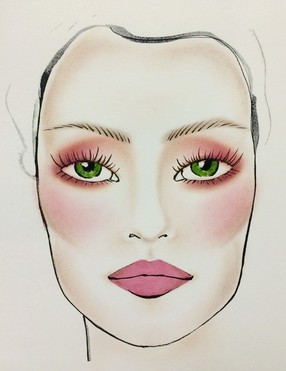 This is the face chart I used to create my eyeshadow look for all you gorgeous green-eyed beauties! When I was thinking of who should model for the green eyes look, I couldn’t think of anyone better than my friend, Lauren. She’s such a sweet and kind person, and I love how luminous her green eyes are when she’s laughing and having a good time. To create this particular look I decided to use my holy grail eyeshadow palette of the moment, Anastasia Beverly Hills Modern Renaissance Palette. While I wanted to keep the look somewhat casual, I also wanted that element of drama to really amp up the eyeshadow look as a whole. I started with adding some depth to Lauren’s eye shape by developing the crease and using a mixture of Raw Sienna and Burnt Orange from the palette. I lightly tapped my brush into Realgar to intensify the outer corner, and added a touch of the shade that inspired this whole look, Red Ochre, to the end of the crease and also the outer corner. I then used a mixture of Primavera and Vermeer on the eyelid itself to create a gradient between the burgundy-brown tones in the crease and the eyelid. Something to keep in mind with such a pigmented palette like this one, is that it will have some fall out. Pigmentation is such a crucial factor in the process of developing cosmetics, because without it the color will not show up when applied. Some shadows are so pigmented that they will have some fall out, but if you tap off the excess product when applying your eyeshadow then there will be less fall out. Brown EyesAlthough a number of people you may know have brown eyes, that doesn’t mean that they are all the same shade. Much like the other eye colors mentioned in this post, there are very different tones for brown eyes but they can all be accentuated by using similar color schemes. When working with brown eyes, I tend to use eyeshadow shades with a deep gold color for the eyelid and a smoky dark brown and olive green combination for the crease. Gold is one of the most popular metallic shades to use on the eyelid and since it is a warm tone, like the color brown, it really creates a captivating look for the wearer. These colors may seem ordinary at times, but using different finishes for each shade will definitely brighten the beautiful brown eyes you have. 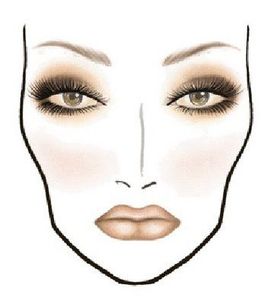 I drew inspiration for the look I created for brown eyes using this face chart. I didn’t do an exact replication of this sultry makeup look, and instead opted for something I found to be more appropriate for everyday, but the foundation for the look I created is still very similar to this sketch. I knew from the beginning while writing this post that I wanted to ask my friend, Sabrina, to be my brown eyed model. Sabrina is a very simple girl when it comes to her eye makeup, but I wanted to show her that you can use basic colors and still achieve a very stunning and effortless makeup look. To create her smoky bronze and gold eye, I used the Too Faced Chocolate Bar Palette. I used a combination of the matte colors Milk Chocolate and Semi-Sweet to darken up the crease. I tapped a small amount of the brown/dark olive green color, Gilded Ganache, in the outer corner to add that bit of sultriness that I wanted to incorporate. Lastly for her eyelid I used Creme Brulee, a vibrant yellow-based gold shimmer, to add that hint of sparkle.
I want to give a huge thank you to my models, Andrea, Lauren, and Sabrina! I hope all of you enjoyed my first post. Ciao! Xo, Abby
0 Comments
By Annie HeilI am writing today to inform you that this will officially be my last blog post for TWIN. L I am off to study abroad in Florence, Italy in about a month and at that time another FABulous beauty blogger will take over my page on our blog.
That being said, I have thoroughly enjoyed writing for TWIN this past year and it is very bittersweet to officially say “goodbye”! The people I have met, things I have learned, and opportunities this blog has given me are something I will never forget and I have truly enjoyed sharing my beauty tips & tricks with all of you. At the very least, I hope my posts have provided you with some entertainment and you enjoyed reading them as much as I enjoyed writing them. If you’ve read any of my posts before you know I’m a sucker for a good quote so it’s only fitting I leave you with one last one before I go! After all, in the wise words of Dr.Suess “Don’t cry because it’s over, smile because it happened.” :) Ciao & Xo, Annie By Annie Heil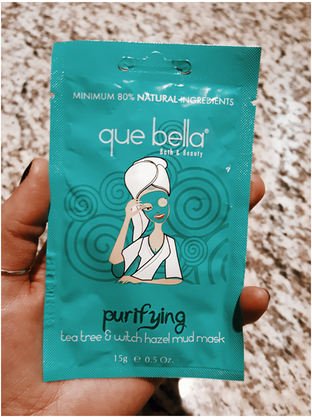 Back when I was in high school, my mom used to always tell me about an ongoing joke between her and her friends that you cannot come out of Target without spending at least $100 dollars. I used to laugh at this back then, thinking “oh that’s just mom talk” but now being the stereotypical broke college student that I am who frequently shops at Target I realize this joke isn’t so much a joke after all. It is a reality! Target has got to be the easiest store to get lost in and every time I go there I ALWAYS find myself wandering over to the hair and beauty isles. It really puts my self-control to the test and although I usually do a good job at walking away from these isles without picking anything up, I just couldn’t resist myself when I came across the Que Bella facemasks. 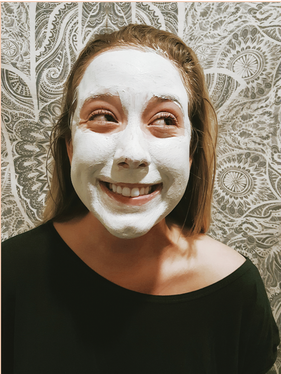 Retailing for about $2.00-$3.00 depending on the kind you get, these face mask packets are hard to pass up with the price so right. I was shopping with my friend at the time, who is a huge fan of Que Bella, and she suggested I try the “Purifying Tea Tree & Witch Hazel Mud Mask” because I have been breaking out recently. Excited to pamper myself, I ended up using the facemask that night after I took a shower and let me tell you, it was AH-mazing. I will say, however, when I first opened the packet the smell of the mask was extremely strong. It was nothing too crazy though and personally I enjoyed the smell because it was very earthy and forest like. The consistency of the mask was thick, luxurious and somewhat cool to the touch. The directions on the back of the packet instructed to apply the mask liberally so I took a good amount and applied about three-four thin layers with my fingers all over my face until the mask was thick and even. Next, I relaxed for 15 minutes and waited for the mask worked its magic.  At first, the mask sort of burned! Leaving my skin a little tingly I assumed it was because I had just hopped out of the shower so my pores were open and sensitive. I noticed, however, that the burning sensation was primarily on my nose and t-zone, which is a hot spot for my blackheads and blemishes! After about 30 seconds the burning sensation went away though and mask dried up nicely for the remainder of the 15 minutes.
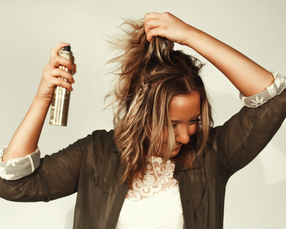
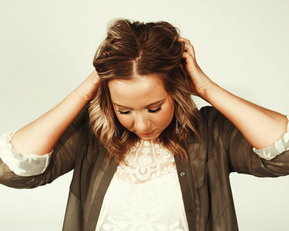
Once the mask was done drying, I removed it by wetting a washcloth with hot water and pressing it onto areas of my face before wiping away the mask. (Tip: After you completely remove the mask, wet your washcloth again with COLD water and run that over your face to close your pores. Hot water opens pores and cold water closes them so it’s important to close them before applying moisturizer so you don’t put bacteria back into the pores you just cleaned!) Because mud masks are so thick and I applied probably a little more of the mask that I needed too, I found this was the most efficient way to take it off. It left my skin feeling detoxed, clean and smooth and I can honestly say I’m excited to use this mask again! Initially, I thought I was only going to get one use out of the packet but given this mask is so thick and they give you 0.5 oz. of it I even had some left over for another time. J Bottom line, I HIGHLY recommend the Tea Tree & Witch Hazel Mud Mask by Que Bella. I already noticed a difference in my skin when I woke up the next morning and for $2.00 a packet, you can’t really go wrong! So next time you need a little pick up, head to Target and grab a Que Bella facemask. I promise your skin (and bank account) will thank you! Xo, Annie By Annie Heil PC: Anne Paoletti It might sound a little strange but when it comes to my hair, I actually prefer how it looks on the second day of not washing it. Now I know, I know to some people this might sound absurd and you can’t even imagine going a day without shampooing and conditioning your luscious locks but a lot of experts actually recommend not washing your hair everyday. In fact, it is very nourishing to let your scalp breathe and allow the natural scalp oils to work their magic. If you can get away with it, going two to three days without washing is actually extremely beneficial for the health of your hair. This is because your scalp oils have a naturally protective quality that resembles the benefits of conditioner. In other words, these oils are nature’s conditioner! Okay, so how do you get a freshly washed hair texture when you haven’t washed your hair in a coupe of days? Well, look no further than the blog post below where I share with you exactly how I keep my hair grease free. Over the years, I have developed a few key tips and tricks I keep up my sleeve for the days when my hair looks and feels “blah” and so far, so good! Tip #1: Try to touch your hair as LEAST as possible! I know this can get really hard, especially if you have a habit of playing and touching your hair 24/7 but every time you touch your hair the oils from your hands get transferred onto it. Aka, the more you touch it the greaser and oilier it is going to get! So try your very best to keep those hands at bay and you’ll be able to get away with washing your hair a lot less.  Trick #1: Use baby powder (or dry shampoo) at night and sleep with your hair up in a loose topknot. When you apply baby powder on your hair at night before you go to bed, you allow the powder to sit on your roots and soak up all of the second day grease and oils as you sleep. In addition, throwing your hair up in a topknot and wearing it while you sleep adds a significant amount of volume and lift into your hair, effortlessly. This means when you wake up your hair will have a blowout texture instead of being flat and sticking to your head.  Trick #2: Add a volumizing mousse and scrunch your hair in the a.m. to reactivate texture. After you take out your topknot, take a little bit of texturizing mousse and scrunch it into the ends of your hair. Depending on the thickness of your hair, make sure you are using the lease amount of mousse possible to get the job done! In other words, if your hair is very fine use about a penny size amount of product and if your hair is super thick use a quarter size amount. This will ensure the mousse doesn’t overpower you hairs natural texture and prevent it from looking greasy and stiff. Tip #2: Curl a couple pieces in the front for extra volume and to frame the face. This step is completely optional but some days when I am really just not feeling my hair I will grab my curling wand a curl a couple of pieces of hair in the front to frame my face. However, the key here is to make sure the curls are not tight. The looser and “beachier” you can make the curls the better. You achieve this by curling away from your face and only holding your hair on the wand for about 3-5 seconds. 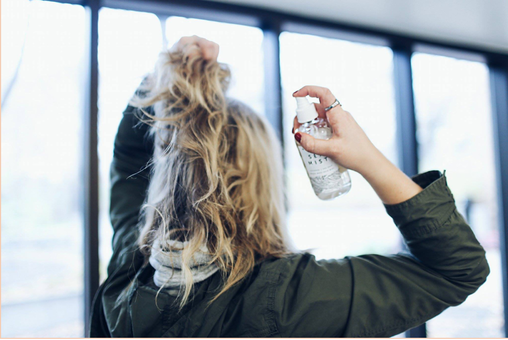 Trick #3: Spritz Sea Salt (or texturizing) spray all over your hair to finish it off & tease if desired. To finish everything off take your favorite texturizing spray and spritz it all over your hair. My personal favorite is Herbivore’s Sea Mist Texturizing Salt Spray/Lavender because it emphasizes the natural wavy texture of my hair and smells AH-mazing. An optional final step would be to take a rattail comb and tease a couple of pieces at the crown. Just remember to be very gentle because being too rough with the comb or too much teasing can really damage your hair. 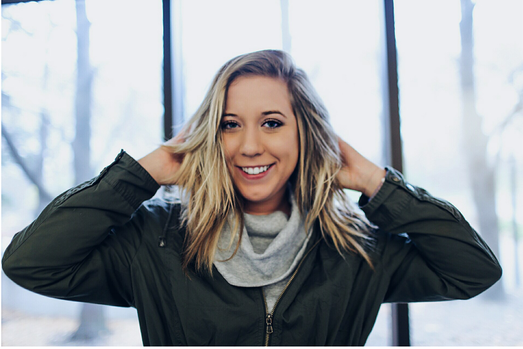 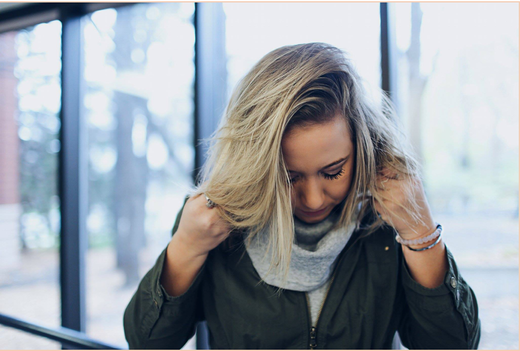 And then you’re done! Perfect second (or third, or fourth) day hair that will have everyone thinking the only reason your hair looks so good is because you wash it everyday. Enjoy your new “do”! :) Xo, Annie By Annie Heil PC: Anne Paoletti Ombre hair, ombre nails, ombre eye shadow, and now....ombre lips?! This beauty trend is never-ending! And personally, I am completely okay with that. Unlike dying your hair ombre or painting your nails ombre, creating the perfect ombre lip is EXTREMELY easy. I’m talking outrageously easy, people who have never touched a tube of lipstick before easy and that’s exactly why I’m obsessed with it. All you need is two different shades of lipstick, one dark and one light, and a couple minutes of your time! So, lets get started. :) 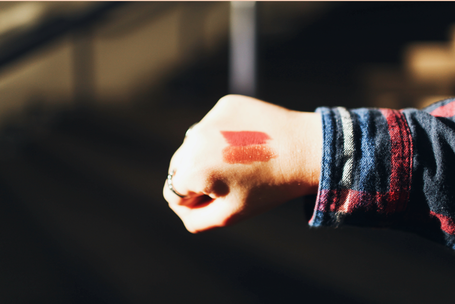 For my particular lip look, I wanted to use lip shades that would be appropriate for everyday wear and not look too bold or overpowering on my lips. I decided to go with two neutral and muted colors, Revlon’s ColorBurst Matte Balm in “Sultry” and Estee Lauder’s Pure Color Long Lasting Lipstick in “Sugar Honey” #83, as a result. In the picture above I swatched both colors on my hand, “Sultry” is on top and “Sugar Honey” is the bottom color. Keep in mind, however, you do not HAVE to use the same exact colors I did! For a more daring lip look, I think a dark cherry burgundy combined with brighter red color would look very sharp. Have fun with it! This tutorial can be mixed and matched with any kind of lip product your heart desires. In fact, I encourage you to not run out to the store and buy new shades of lipstick because I guarantee you already own two shades that work perfectly together! Simply swatch a bunch of combinations on your hand until you find one you like (that’s what I did) 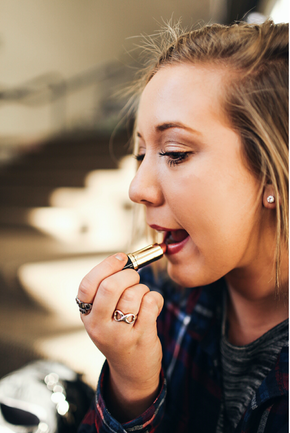 After you have picked two colors, begin by outlining your lips with the darker shade (in my case Revlon’s “Sultry”) and slightly bring the color in to the center of your lips without completely covering your lips. Next, take your lighter shade (in my case Estee Lauder’s “Sugar Honey”) and apply it to the center of your lips and the areas you have not applied the darker shade. Carefully blend the two colors together by lightly smacking your lips together not rubbing! Rubbing your lips together too hard will cause the colors to completely blend together and take away the ombre, two-toned effect. An optional final step would be to take your favorite shimmery or shiny lip-gloss and applying a very small amount to the very center of you top and bottom lip. This gives the illusion of fuller, bigger lips without getting injections. You’re welcome. 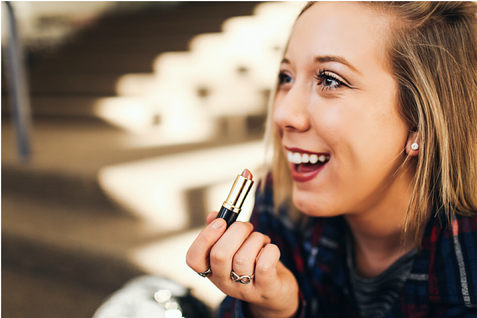  Happy ombre-ing! :) Xo, Annie By Annie Heil PC: Anne Paoletti The first time I came across a hair bow I was immediately intrigued. When I say hair bow though I’m not talking about the stereotypical huge hair bows cheerleaders wear or the tiny colorful ones moms will put in their daughters hair. Rather, I’m talking about an updated, sleek and sophisticated type of hair bow that will turn heads wherever you go. That’s right, I’m talking about a hair bow made out of hair. I mean, come on, you really can’t look at this hairstyle without immediately wanting to attempt it. Using only and elastic and bobby pins to hold down each of the two sections of the bow, this hairstyle looks a lot more difficult to recreate than it actually is. To find out just how easy it is, keep reading!  Step 1: Begin by grabbing two even sections of hair just above your ears and pull them to the back of your head. Secure with a hair band elastic and create a small half-bun in the center of your head by not pulling the hair entirely through on the last twist of the elastic. 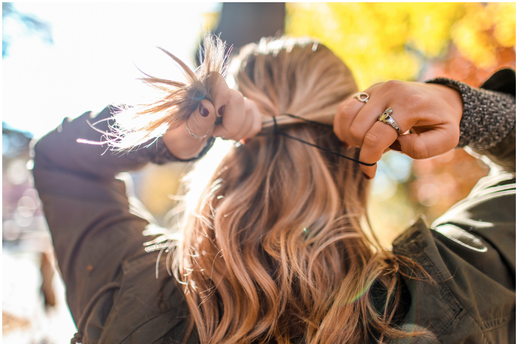 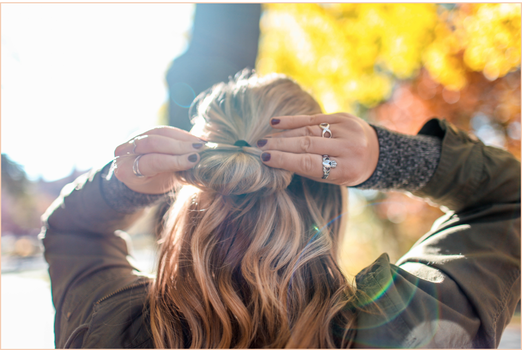 Step 2: Next, evenly divide the small half bun down the middle into two separate sections. These will turn into the shape of the bow. Fluff out one of the sections from the half bun and twist it down and to the right to separate and add volume. Secure the hair down to your head using a bobby pin. 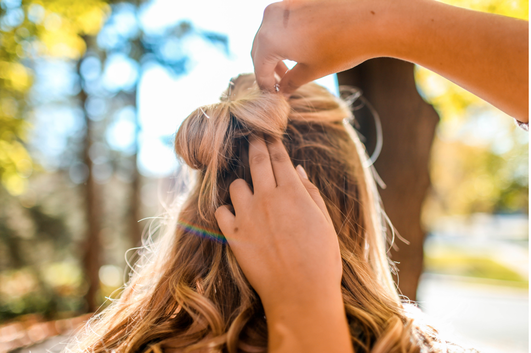 Step 3: Repeat this with the second section of the hair bun to create the other side of the bow. Again, use a bobby pin to secure the hair down and make sure you are camouflaging the bobby pin by putting it on the hair inside each side of the “bow”. 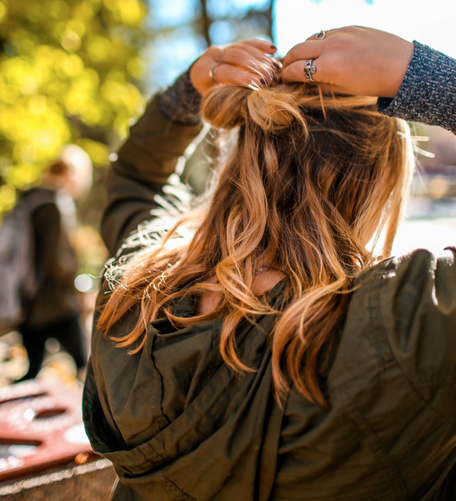 Step 4: Lastly, use some of the remaining hair underneath your bow to mask the hair elastic in the middle. Pull a small piece through a hole in your crown and tuck it in using a bobby pin. If your hair is long enough, go ahead and flip out the remaining ends from the piece of hair hiding the elastic to really add some detail into your bow. 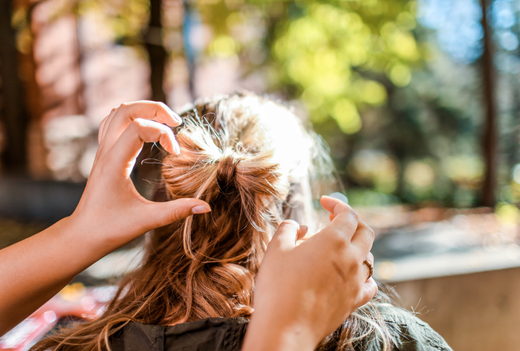 And there you have it ladies! In just four short steps your innovative and (literally) priceless hair bow is officially complete. Now go out and rock a hairstyle even Sir Mix A Lot “can’t stop staring” at. :) Xo, Annie By Annie Heil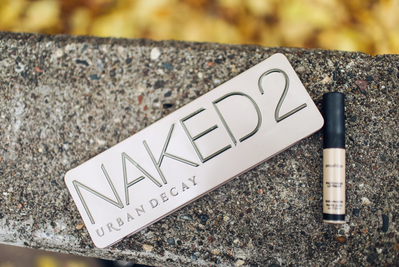 I don’t know what it is about eye shadow, but out of all the makeup products in the world eye shadow is by far my favorite one to apply. From dark smoky eyes to light shimmery neutrals, the possibilities are endless when it comes to creating eye shadow looks and it makes experimenting with various colors and palettes a ton of fun. In fact, over the years I have probably spent far too many hours trying out different color combinations and looks with numerous palettes. It was totally worth it in the end though because I have finally mastered my go-to everyday eye shadow look. That is why today, I decided I would spare you all some time and share with you exactly how I accomplish it! First things first, lets clarify where the common eye shadow placement terms are located on the eye. Below, I attached a detailed chart of what part of the eye I am talking about when I refer to places such as the “crease, tear duct and outer v”. I know when I first looked at an eye shadow tutorial online I was horrendously confused so if any of the terms I say don’t make sense refer back to this helpful little chart. :) 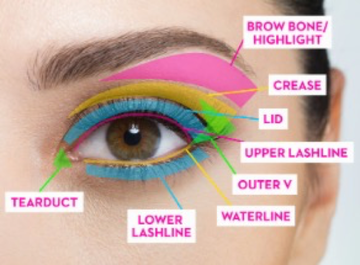 Now, lets begin! Before applying any eye shadow I would highly recommend using a primer. This ensures your eye shadow stays on all day and doesn’t smear or wrinkle when you blink. I use Smashbox Photo Finish Lid Primer, but any brand of primer works. If you don’t feel like purchasing a primer, you can use a little bit of your under eye cover-up or concealer and apply it all over your lid and lower lash line with your finger instead. 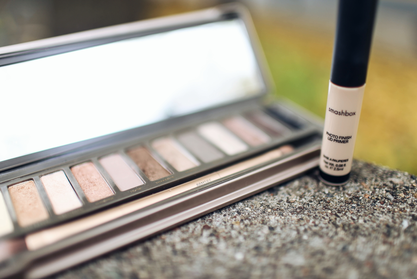 Next I took a pale yellow-toned matte shade and applied it all over my lid as a base color. For this particular look, I used the Urban Decay Naked 2 palette but any eye shadow palette with natural colors will work as a substitute. After applying the base color, Foxy, with an all over eye shadow brush take a shimmery golden bronze color, I used Half Baked, and apply this all over the lid as well. For more definition, I used Chopper from the Naked 2 palette and applied a light coat of the shimmery copper shade with silver micro-glitter to the lid as well. 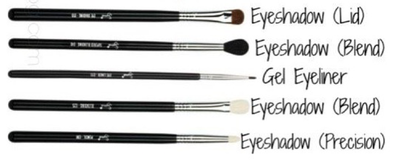 On a large blending brush I took the color Tease, a creamy pale brown matte color and buffed it into the crease using windshield wiper motions. On a precision eye shadow brush, I took a dark bronze shimmer shade called Snakebite and continued buffing this into the crease and along the lower lash line to frame my eyes. I then applied Bootycall, a light shimmery pink into the tear duct and under the brow bone to highlight. Lastly, with a gel eyeliner or angled brush I took the shade Busted, a deep brown shimmer color, and applied this along the upper lash line as mock eyeliner and into the outer v. 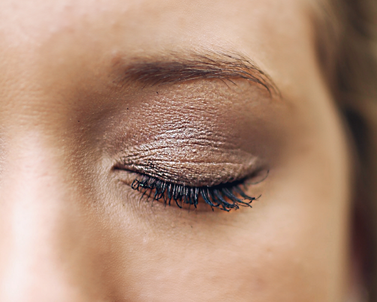 Finally, apply your favorite mascara and voila! You officially have a stunning eye shadow look that is perfect for everyday wear. And the best thing about this look is after you get the hang of the sequence it can easily be accomplished in less than five minutes. A gorgeous eye shadow tutorial that is fast, simple AND stress-free, what more could you ask for! Xo, Annie 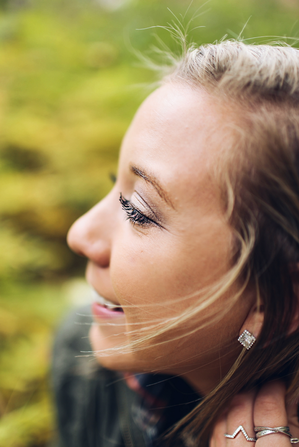 By Annie HeilIf there’s one thing Kylie Jenner is known for, it is definitely her lip kits. From her wildly successful matte lip kits to her glosses and newly released eye shadow palettes and eyeliners, it is pretty obvious Kylie has done a very good job branding her cosmetic line. In fact, it is extremely difficult if not impossible to get your hands on Kylie Jenner cosmetics because they are almost always sold out. Aside from their limited quantity, Kylie’s makeup products are also fairly expensive. Her metal lip-glosses cost $18.00 each and the matte lip kits cost $29.00. Add on the shipping and handling costs from purchasing the lip products online and you have yourself one pricey lipstick investment. That is why when I came across the company ColourPop, a company that offers multiple Kylie Jenner lip kit dupes, I was ecstatic. I am a huge sucker for a good deal and as you can probably tell from the majority of my blog posts, discovering reliable makeup dupes is practically a hobby of mine. There’s just something about finding a bargain buy that is so rewarding, especially if the duplicate works equally as well or even better than it’s high-priced twin. So, enough of my blabbering! Let’s jump right into it. ColourPop is a completely online cosmetic retailer that was founded in 2014 by Seed Beauty. All of ColourPop’s products were created and are made in the city of Los Angeles and each lipstick and gloss is extremely affordable, like only $6.00 broke college kid kind of affordable. 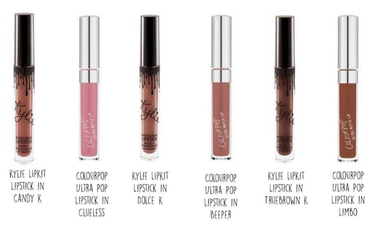 Kylie Jenner’s arguably most popular lip kit shades are Candy K, Dolce K, and True Brown K. Crazy identical ColourPop Duplicates are Clueless, Beeper and Limbo. If you were to purchase all three of these shades from Kyle Jenner your subtotal would be about $87.00 + shipping and handling. Purchase all three of these shades from ColourPop and your total is going to be approximately $18.00 + shipping and handling, aka less than the price of ONE Kylie Jenner lip kit! That’s a steal if you ask me and the duplicates don’t stop there. Below I went ahead and typed up a little ColourPop duplicate cheat sheet so you can easily find the Kylie Jenner lip kit shade you are just dying to have. 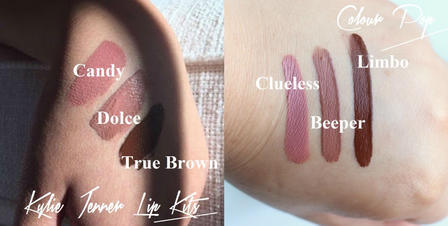 Kylie Jenner Lip Kits ColourPop Posie K & Candy K Clueless Dolce K Beeper True Brown K Limbo Mary Jo K Creeper Koko K Midi Kourt K Guess Leo Lax Ginger Love Bug  So go ahead and “splurge”! These ColourPop lip-glosses will give you the same look and feel as Kylie Jenner’s for less than half the price. Give a woman the right (priced) lipstick and she can conquer the world. :) Xo, Annie By Annie Heil No, your eyes are not playing tricks on you and yes, you read that title right. Flash Tattoos ARE still cool and before you go and disagree just hear me out! Permanent tattoos have been a common choice for self-expression and body modification for years where as temporary tattoos are typically viewed as a trend for little kids and tweens. That is, until the introduction of flash tattoos hit stores about a year ago and people across the globe picked up on the trend. After all, if Queen Bey consistently rocks them (enough that she created her own line of them!), why can’t everyone else?!
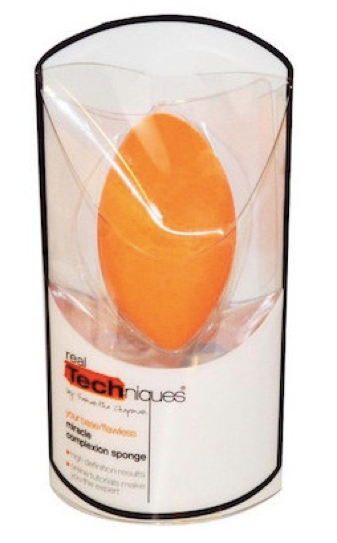
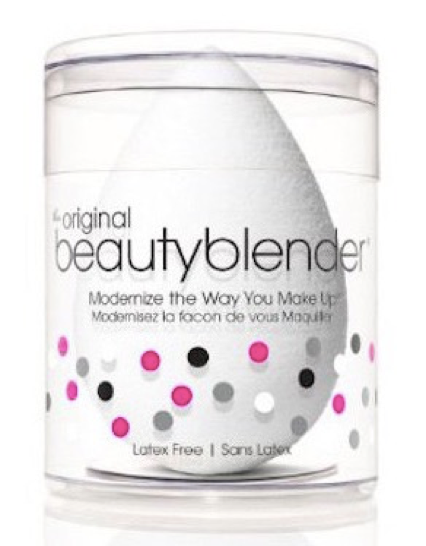
By Annie HeilI hate to admit it but the number one thing I spend my money on is makeup. Even if I don’t need it I always find some way to justify it, after all why have a single tube of mascara when you can have eight? Unfortunately, being a broke college student and addicted to buying makeup does not go hand in hand. In other words looking at my vanity full of makeup and my empty debit card balance is bittersweet. This is why over the years I have learned that I can still get my makeup “fix” and simultaneously save my money by purchasing makeup dupes. Dupes can be described as a cheaper product that is comparable to a more expensive, often higher quality one. Some may argue dupes are a complete waste of money because they typically don’t last as long or have any impressive benefits. But don’t let this scare you off! As an active user or makeup dupes I can honestly say they are nothing to scoff at. So let’s go ahead and jump right into it. Below is a list of my top 7 insanely, irresistible makeup dupes that will change your low card balance and your look. It’s the best of both worlds. 1. Save about $15 by purchasing the Real Techniques Miracle Complexion Sponge ($4.19) instead of the ever so popular Beautyblender Pure ($20).
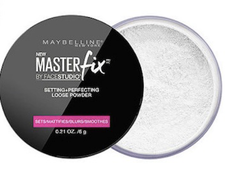
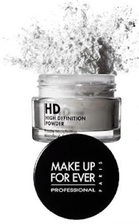
2. Try the Master Fix Setting + Perfecting Powder by Maybelline ($7.99) and ditch Make Up For Ever’s HD Microfinish Powder ($35). They are essentially the exact same product and you save about $27!
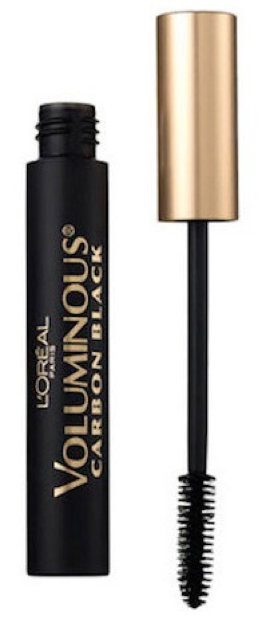
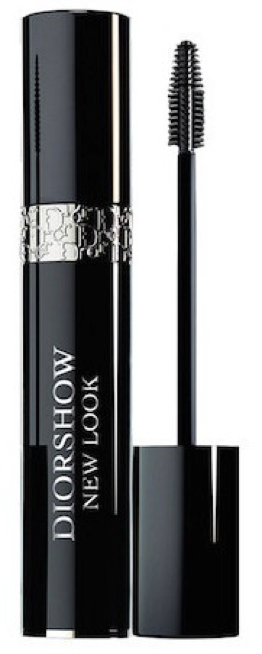
3. Brand name mascaras can get extremely expensive and trust me drugstore mascara works just as well. Try L’Oreal Paris Voluminous Carbon Black ($5.89) mascara instead of Diorshow ($27.50). Just think of all the other makeup products you can buy with the $21 you are saving!
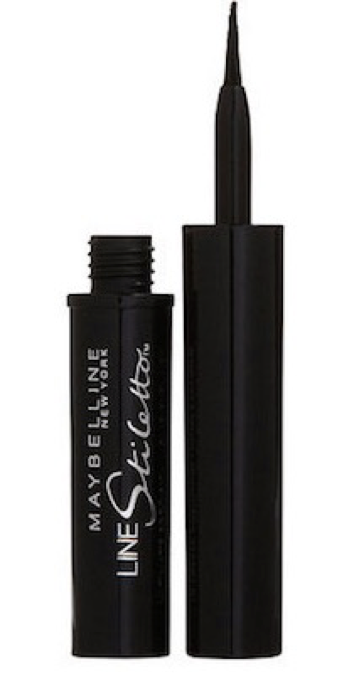
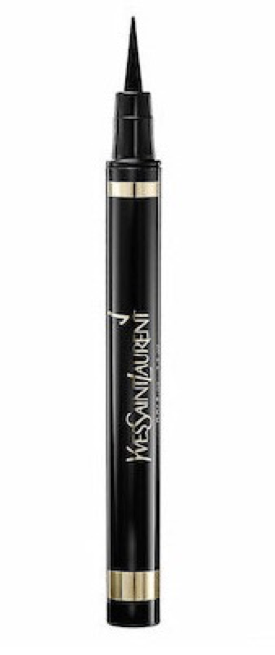
4. All about a cat eye? Use Maybelline Line Stiletto liquid liner ($5.59) instead of YSL Eyeliner Effect Faux Cils ($34) and save about $28!
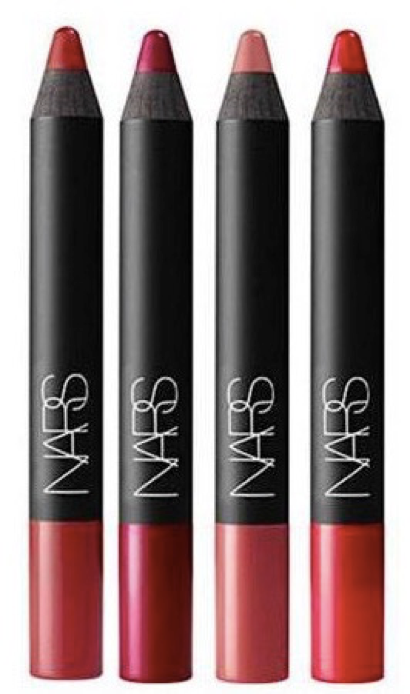
5. Rocking a bold lip is very in this spring, being broke is not! Get the perfect matte lip by trying Sonia Kashuk Velvet lip crayons ($7.99 each) instead of NARS Velvet matte lip pencil ($26) and save $18.
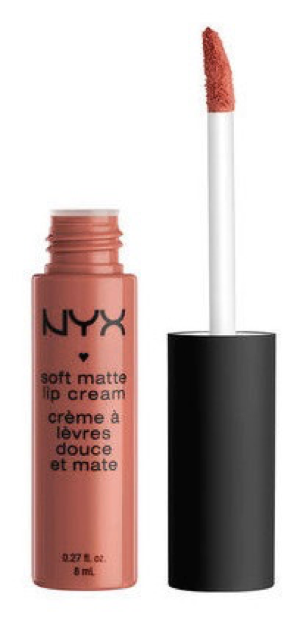
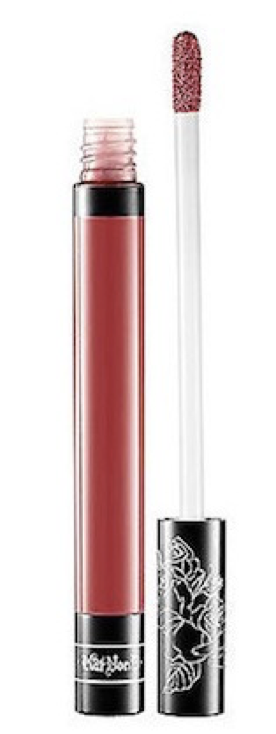
6. More of a gloss kind of gal? Kat Von D makes great Liquid Lipstick in Lolita ($20) but try NYX Soft Matte Lip Cream in Cannes ($6) to get the same look for less than half the price.
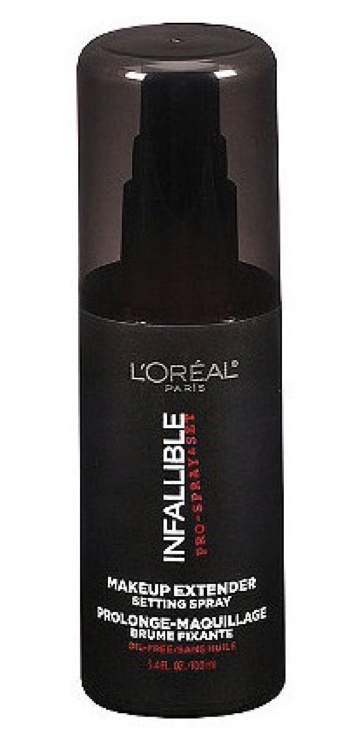
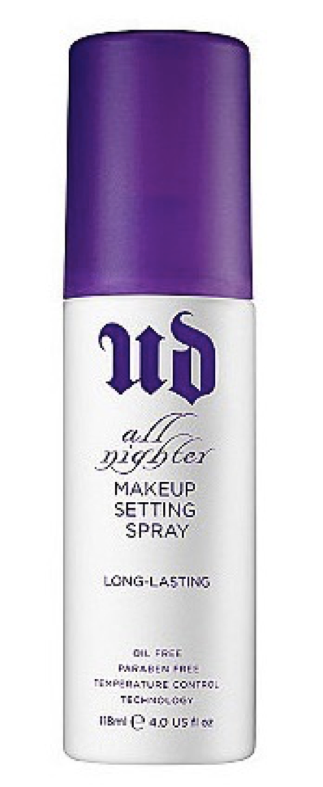
7. To prevent makeup meltdowns and keep your “face” on all day try L’Oreal Paris Infallible Setting Spray ($13.79) instead of Urban Decay All Nighter Makeup Setting Spray ($30). Less than $15 dollars to keep your makeup in place? Yes, please!
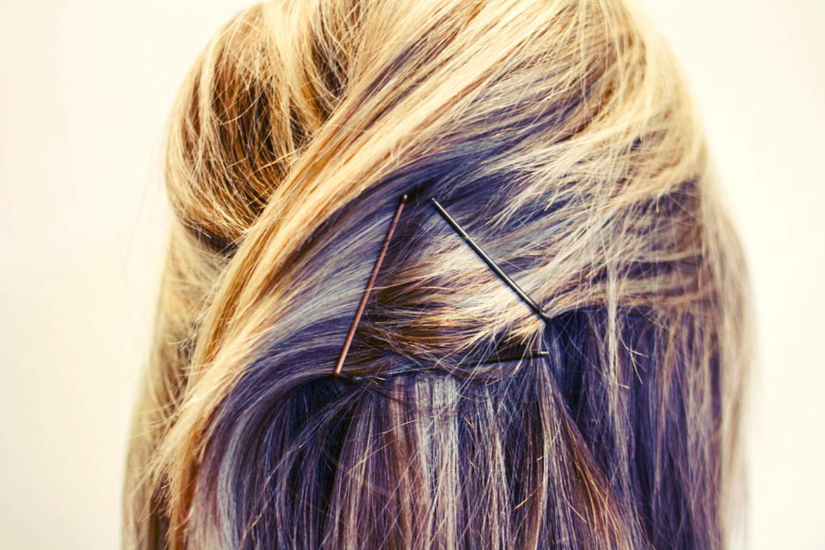
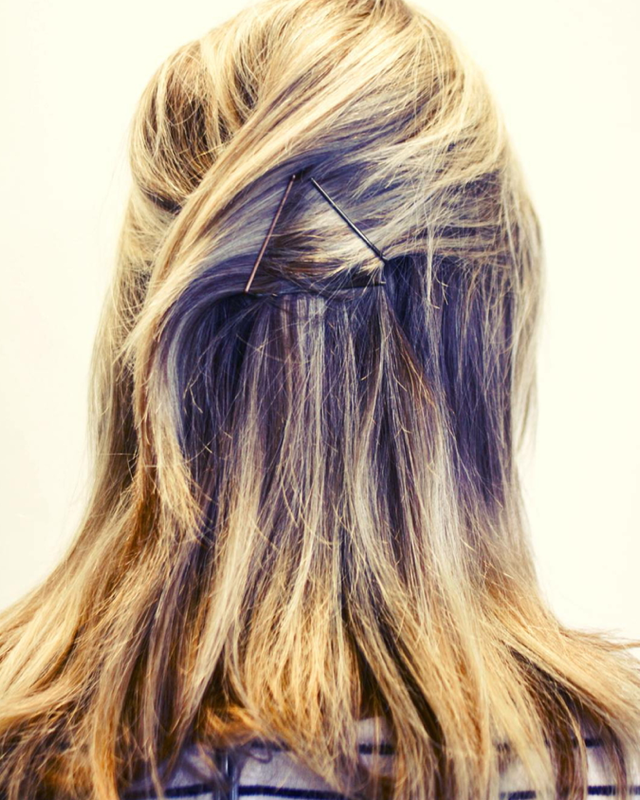
Till next time fellow makeup junkies :) Xo, Annie By Annie HeilWhat if Jay Z wrote about lost bobby pins instead of a quote on quote girl who isn’t his problem? The song probably wouldn’t have been as popular as the original, but I must say I’m curious to know what the rest of the lyrics would be. “If you having bad hair days I feel bad for you son”, or “if you don’t like my hair you can say goodbye”? Oh gosh, okay maybe I don’t want to know the lyrics to a bobby pin song…stick to writing about girls Jay Z. Using bobby pins to accessorize is a very overlooked opportunity. I can’t even begin to tell you how many I’ve lost over the years and I swear sometimes they grow legs and walk away. However, on the rare occasion I find more than two lying around I immediately turn to my three absolute favorite bobby pin hairstyles. 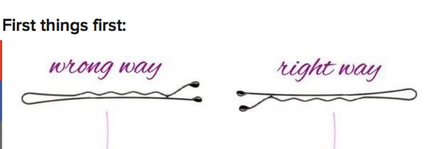 I know it may sound ridiculous but a lot of people don’t know the proper way to use a bobby pin. The jagged side faces DOWN, never vice versa! Additionally, if you’re planning on wearing your hairstyle for a long period of time try spraying them with dry shampoo or hairspray beforehand. This adds friction and holds the bobby pin securely in place when the product dries. 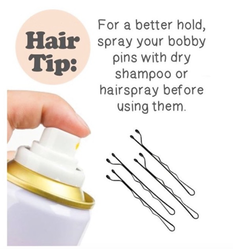 #Hashtag: Social media babes this hairstyle is for you. It closely resembles a hashtag and it is a cute way to keep your front hair out of you face. Depending on where you part you hair, take two small sections and secure them with two horizontal bobby pins placed parallel to each other. Next, take two more and secure them vertically to create the hashtag. Make sure the pins are equally spaced apart to resemble the shape as much as possible and when inserting the horizontal pins, pull them away from your face. When inserting the two vertical pins, pull upwards. 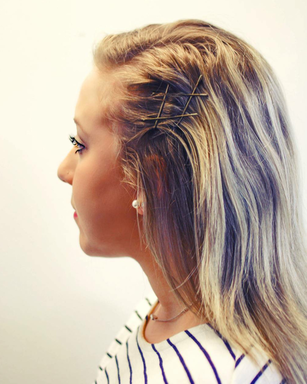 Chevron: The second hairstyle is perfect if you’re looking to spice up a simple low bun, ponytail or even a side braid. I wear my hair in a low bun all the time so for this look I began by sweeping all my hair to the nape of my neck and tying it in a low messy bun. Then I took two bobby pins and placed them in the shape of a “V”, making four rows. To position the pins in your hair a little easier, make sure to always insert them diagonally down towards the floor. The two ends of the pins should always connect for the “V’s” to stay in place and create the chevron pattern down your head. 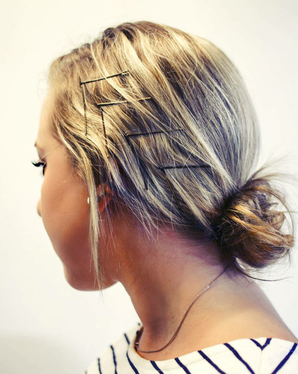 Triangle: The third and final look is a chic bobby pin triangle designed to hold back a half updo. This one is perfect for those days when you’re torn between spending time on your hair or just throwing it up and out of your face. Personally, I struggle with this on the daily so I adore this look. If you have a lot or very long hair, first secure hair from one side with a bobby pin and hide it under the hair from the other side. Then you can go ahead and create the triangle. This can get tricky, but I found it’s easiest to secure the bottom pin first then diagonally insert the two sides of the triangle down towards the floor. Just make sure the ends are always touching, otherwise your triangle will end up looking more like random chicken scratches!
Feeling adventurous? Try creating these looks with different colored bobby pins and have a blast “pinning”! :)
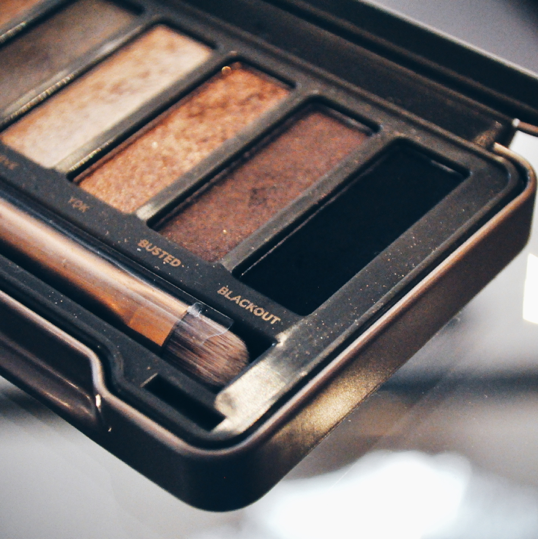
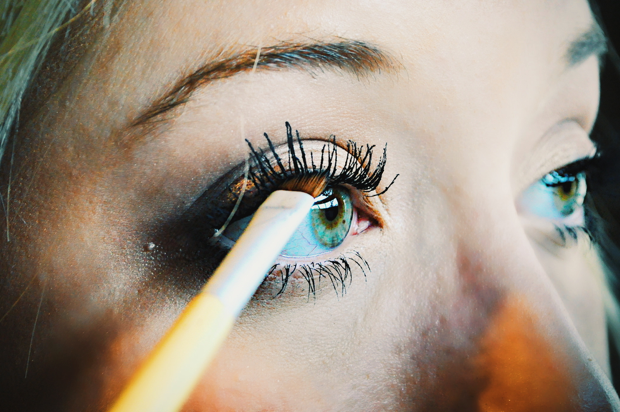
Xo, Annie By Annie Heil Applying false eyelashes can be a struggle, not to mention extremely time consuming! That is why over the years I have developed effortless tips and tricks to get the look without all the hassle. First things first, pick up an eyelash curler and curl your lashes! I cannot stress how important this step is and it blows my mind how often people skip it. It only takes .2 seconds and I pinky promise it will make a world of difference! Next, take an eyeliner brush and apply a thin layer of black shadow on your top and bottom lashes to create a base. I am using a slanted bamboo eyeliner brush from EcoTools and Urban Decay’s Naked2 shadow in “Blackout”. To prevent getting specs of shadow fallout all over your face, hold a plastic spoon or credit card underneath your bottom lashes.
After you apply the shadow base, take your favorite mascara and apply two coats. Start at the base of your lashes and wiggle the wand in a back and forth motion while slowly moving up. The left and right motion will ensure every lash is entirely covered and help lengthen them. Make sure to wait a couple seconds in between each coat as well, otherwise your lashes tend to clump and turn spider like.
Repeat this process 3-4 times by applying black eye shadow first then two coats of mascara. I like to switch up the types of mascaras I use in between every two coats because I find it sticks to the powder better when you alternate brands. My four go-to mascaras are Maybelline Great Lash, Maybelline The Falsies Big Eyes Mascara (with two applicator sizes), Revlon Butterfly Intenza and Wet n Wild MegaPlump. The more you repeat this process the bolder and “falser” your lashes will appear. I cannot tell you how many compliments I have received when I apply my mascara this way and like I said it’s a lot easier than dealing with false lashes. So skip the glue, tweezers, trimming and blending and grab your favorite black eye shadow. Your lashes will never look the same! Xo, Annie By Annie Heil From the soothing pedicure massage chairs to the perfectly painted tips you walk out with, it is no secret getting you nails done is a treat. What’s not a treat, however, is how dang expensive it can get to regularly go get your nails done. Sure, nail services are the perfect way to pamper yourself, but there’s definitely nothing more frustrating then paying $15 for a manicure only to have it chip two days later. Nail junkies, I know you can relate and this is exactly why gel manicures have become the norm. They can last up to three weeks without any chipping and the best part is you don’t have to wait for your nails to dry before leaving the salon. After your nails sit under the UV or LED lamp the nail techs take a cotton ball saturated with solution and wipe all of your nails clean. No matter how many times I get my nails done I am still terrified one day all of the polish will come off when they rub them. Now to be completely honest I was not a big advocate of gel manicures when I first got one. It sounds shocking, I know, because I totally geared you up for this post to be all about how much I love them but it wasn’t until I stumbled upon “mood” colors that I actually started getting them regularly. Do you remember the movie Aquamarine? Where Aqua’s “fingerscales” would change color with her mood? That is exactly what color changing “mood” nail polish does! “In the mood” nail polish changes color depending on your body temperature and chemistry. An adjustment in body temperature such as running your hands under warm water, going outside in the freezing cold or even mood swings will cause the color to change. This means your fingers will be one color when your body is hot and a completely different color when you’re cold!  (“Warm” nail color) 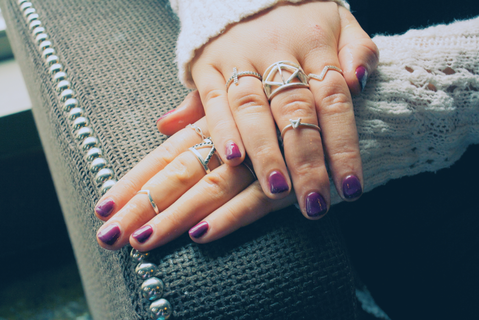 (“Cold” nail color)
The colors continue to alternate back and forth as your body temperature changes and I can honestly say it is the most entertaining manicure I have ever had. Every time I look down at my fingers, they are a different color! If you’re someone who always has a hard time picking out a color and then gets sick of it after five days (me) then this nail polish is DEFINETLY for you. So go ahead, unleash your inner Aquamarine and try “mood” nail polish next time you go get your nails done. I promise you wont regret it! Xo, Annie By: Annie Heil  Jackson 5 said it best, “A-B-C, it’s easy as 1-2-3, as simple as, do re mi A-B-C, 1-2-3 baby, you and me girl”! Did you have as much trouble reading that without humming the tune as I did? Phew, I thought I was the only one! Every time I hear that song I am instantly reminded of one of my friends who was notorious at parties for stealing the AUX cord. I kid you not she ALWAYS played this song and as hard as everybody in the room wanted to tell her to turn it off, no one ever did. I guess there’s just something about a 1970’s throwback song that puts everyone in a good mood. I blame it on the irresistibly catchy melody and maybe the a a a a a a a alc…...oh never mind! Anyhoo, aside from classic Jackson 5 hits there is also just something about warm weather and a festival that immediately puts people in a good mood. From Wee Fest to Summerfest, Coachella to Lollapalooza, I think it’s safe to say spring and summer is the best time of the year for music festivals. Unfortunately, I highly doubt any of the artists at these festivals will sing “A-B-C, Easy as 1-2-3”, but what I can guarantee you is that your festival hairstyle can be A-B-C do re me easy in just yep, you guessed it, 1-2-3 steps. J So, for those of you who like to spend less time getting ready and more time having fun like moi, keep reading! Because this hairstyle will be your bread and butter for any kind of festival you attend this summer. Step 1: Curling Start off by taking pieces of your hair and wrapping them around a 1” curling iron. I am using a Conair – Infiniti You Curl Curling Wand (curling iron without a clamp) because it is absolutely perfect for all kinds of hair lengths. To get “effortless bohemian curls” make sure to alternate the amount of hair you wrap around your curling wand. Randomly pick up small, medium and large pieces of hair and make sure you are always switching up the direction you curl your hair by either wrapping the hair away or towards the face. Don’t worry about the curls being too polished, this look is supposed to be messy! 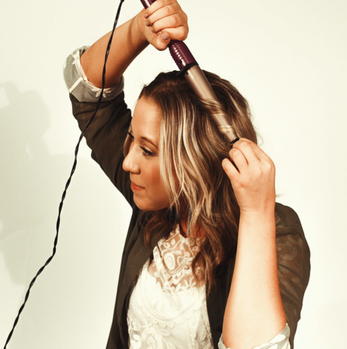 Step 2: Two Loose Braids After your hair is completely curled take a medium sized section of your hair towards the back of your crown and begin loosely braiding it. The type of braid you choose to do is completely up to you, but I decided to do a fishtail because I feel like it fits the vibe of the hairstyle best. Finish braiding one braid and repeat the exact same thing with another medium sized section of hair on the other side of your head. Tie both of the braids off with a clear elastic. Next, carefully tug on the multiple sections of the braid to loosen it up and make it appear larger. Make sure not to pull too hard though! You don’t want the braid to become completely undone. Step 3: Texturize & Scrunch Finally, add some texture! After you spray a texturizer directly follow it up by softly scrunching the hair. This will give the hairstyle a lot of body, texture and grit. I used Suave Professionals Keratin Infusion Color Care Dry Shampoo so that I could add texture while also reducing any shine from grease. And voila! You are finished! Now go enjoy your festival……or some more Jackson 5 throwbacks. “Oh darlin’, I was blind to let you go”! Xo, Annie 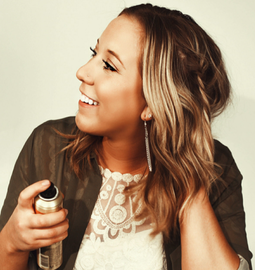
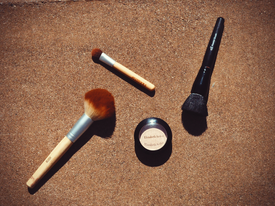
By Annie HeilNow I know what you may be thinking, “strobing”? What on Gods green earth is “strobing” and why would I ever want my face to be “strobed”? Well in the non-makeup world strobing is usually associated with strobe lights flashing sporadically. In the world of makeup, however, strobing is the new, all-natural highlighting technique that uses bright products to accentuate the high points of your face. Think of it as the sister to contouring because by drawing attention to the features of the face that naturally accentuate light, the parts of the face that aren’t highlighted sink inwards, mimicking contouring. Many refer to strobing as a “glowing from within” look that can completely redefine and sculpt your face. It focuses solely on highlighting and is much less time-intensive than contouring and highlighting your entire face. In fact, according to PopSugar strobing is “the brilliant new face-sculpting hack for lazy girls”. What two words go perfectly together? College and lazy, and what word holds these two together like glue? Cheap. So makeup junkies on a budget fear no more because below I have created an extremely affordable, foolproof guide on how to achieve the perfect strobed makeup look. ☺ First things first, decide which strobing makeup products to use and how intensely you wish to apply it. It is important to pick a highlighter or illuminator product that matches your skin tone to avoid an overwhelming frosty, shimmery mess. Fair Skin, stick to soft white gold and champagne tones. Light to Medium skin; go for the pink/peach champagne tones. Olive Skin, you are going to want to grab golden tones. Dark Skin, terracotta tones are the ones for you. Below are four different inexpensive illuminators and highlighters, which can be found at any drugstore. 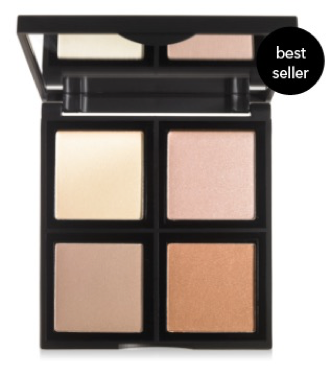 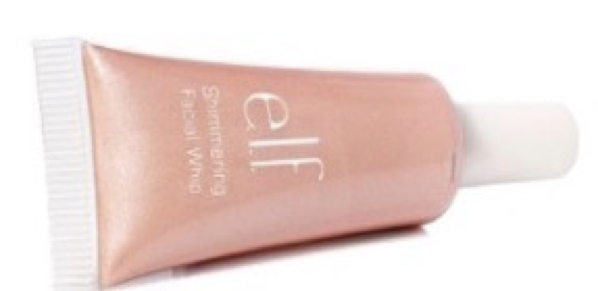 e.l.f. Illuminating Palette $6.00 & e.l.f. Shimmer Facial Whip $1.00 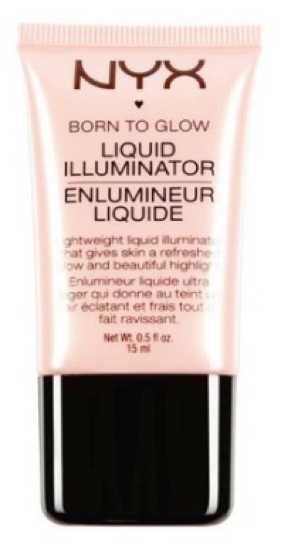 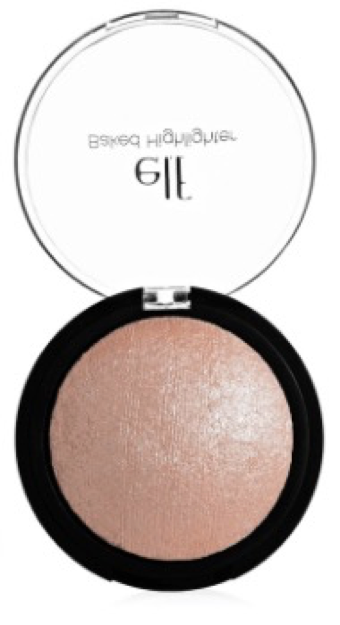 NYX Born to Glow Liquid Illuminator $7.50 & e.l.f. Baked Highlighter $3.00 Next, identify the parts of your face where light would naturally hit your face and begin softly highlighting it. Less is definitely more when it comes to this look and avoid spreading the product all over your entire face. This means focus on applying your highlighter above your cheekbones, brow bones, and the center of your forehead, down the bridge of your nose, above your Cupid’s bow and center of your chin. 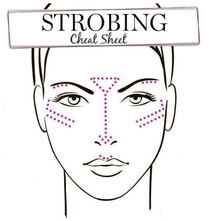 If you are using a shimmery loose powder, applying the makeup using a different sized brush for each unique section of your face. For example, apply highlighter below the brow bone, down the bridge of the nose and above your cupids bow with a small powder brush. A large fluffy blush brush is perfect for the cheekbones and center of your forehead where as a more stiff powder brush is perfect for the center of the chin.
If you are using a liquid illuminator or lighter shade of foundation, applying the product with your fingers works just fine. Just make sure to blend, blend, blend and respect the shimmer! Strobing can be intimidating and the last thing you want is to walk around campus looking like you just stepped out of Libby Lu.
So embrace the hottest makeup trend of the year and prepare to get the compliment “you look like you’re glowing!” a lot. Happy strobing ☺ xoxo, Annie |