|
Eyebrows. It is one of the hardest parts of the basic makeup routine for people to master. Some people may want that “on fleek” eyebrow look that they see pop up on Instagram, while others may want a more soft and natural look for their eyebrows. I’ve gone through many phases with my eyebrows, including a phase where it almost looked like they had been drawn in with a brown sharpie (Mom, if you still have any pictures from this time, burn them and destroy the evidence). In today’s post, I’m going to be sharing my two most important tips for your eyebrow needs. 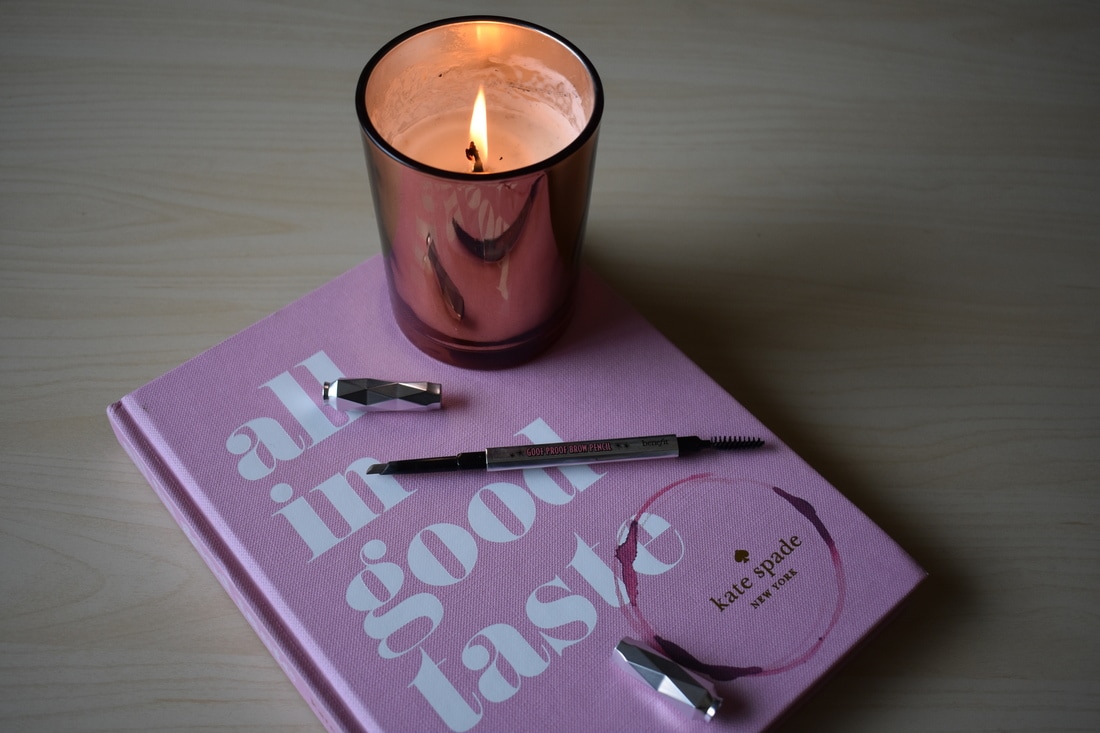 Eyebrow Tips
2) Decide what product will work best for you Pomades and pencils are usually the main types of products created for eyebrows. Pomades are little pots filled with a gel, and you apply this gel with a small angled brush to fill in your eyebrows. Pomades are messy and I don’t recommend using them if you’re a beginner. Also it takes a lot more time to use pomades. If you have the time and you want that bold “on fleek” eyebrow that all the Instagram beauty influencers have, I recommend the Anastasia Beverly Hills Dipbrow Pomade. For going more of the natural route, I recommend eyebrow pencils. Pencils are great for if you don’t have a lot of time in the morning to get ready. They’re fast and easy to use, but one downside to using a pencil versus a pomade, is that they don’t last as long. Pomades are very saturated with pigment, so you don’t really need to apply a lot of product. Pencils aren’t as pigmented, so to build up the color you have to use more product. 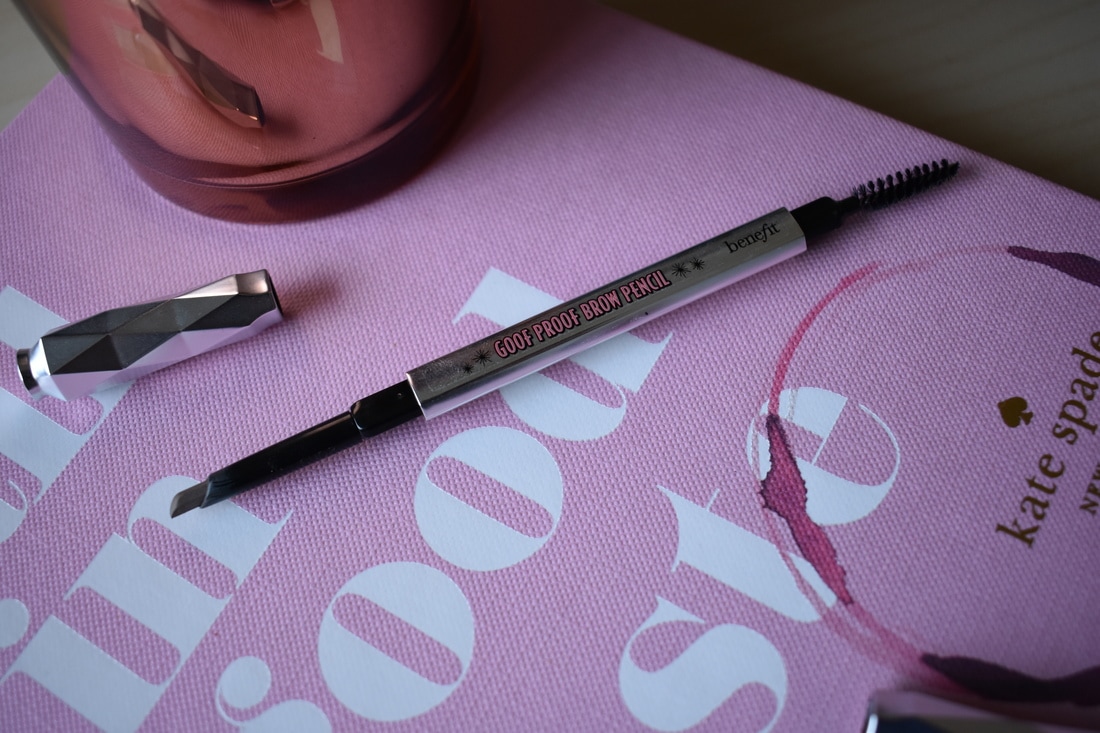 I’m currently using the Benefit Cosmetics Goof Proof Brow Pencil (I use shade 02-light). I have been using this product for the last six months and this has been the best eyebrow product that I’ve found so far. I feel like I get the happy medium between a pencil and a pomade. It is a pencil, so it is faster and easier to use, but I find that this pencil has a lot more pigmentation than other ones on the market, so it can give me that more defined and bold brow as well. 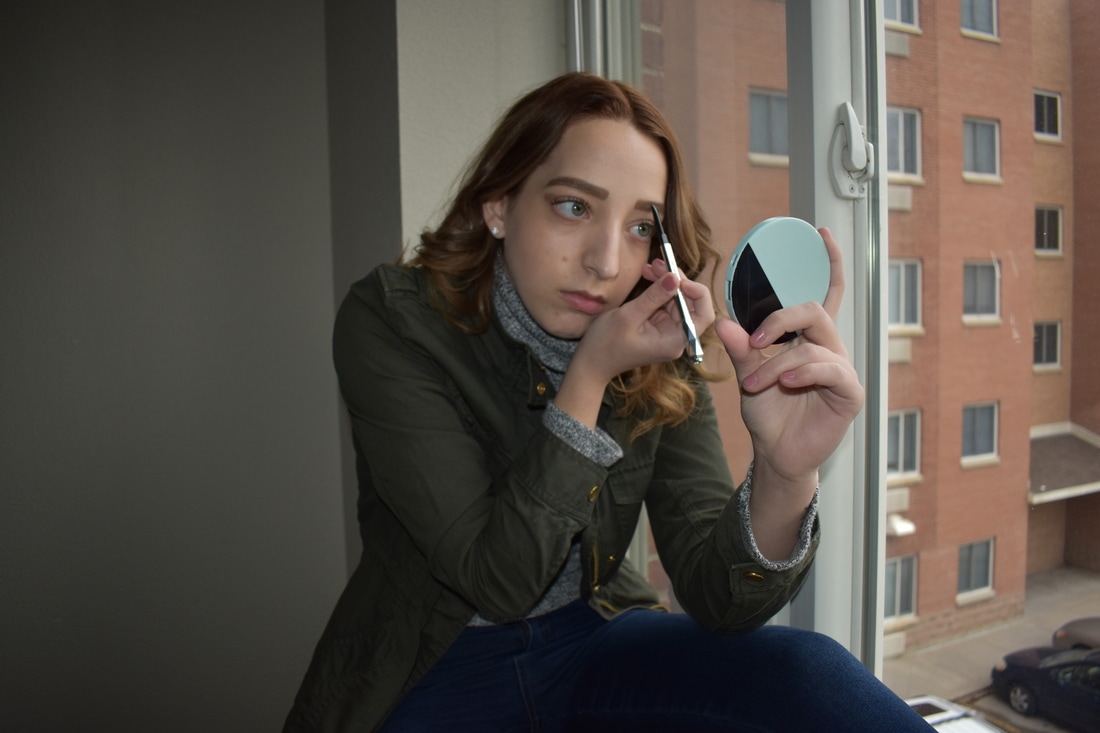 Honestly, when it comes to your eyebrows the best thing to do is practice through a lot of trial and error. You will eventually find something that works for you, but you’ll probably have to go through some cringe worthy moments along the way too! I hope you all enjoyed today’s post. Ciao! Xo, Abby 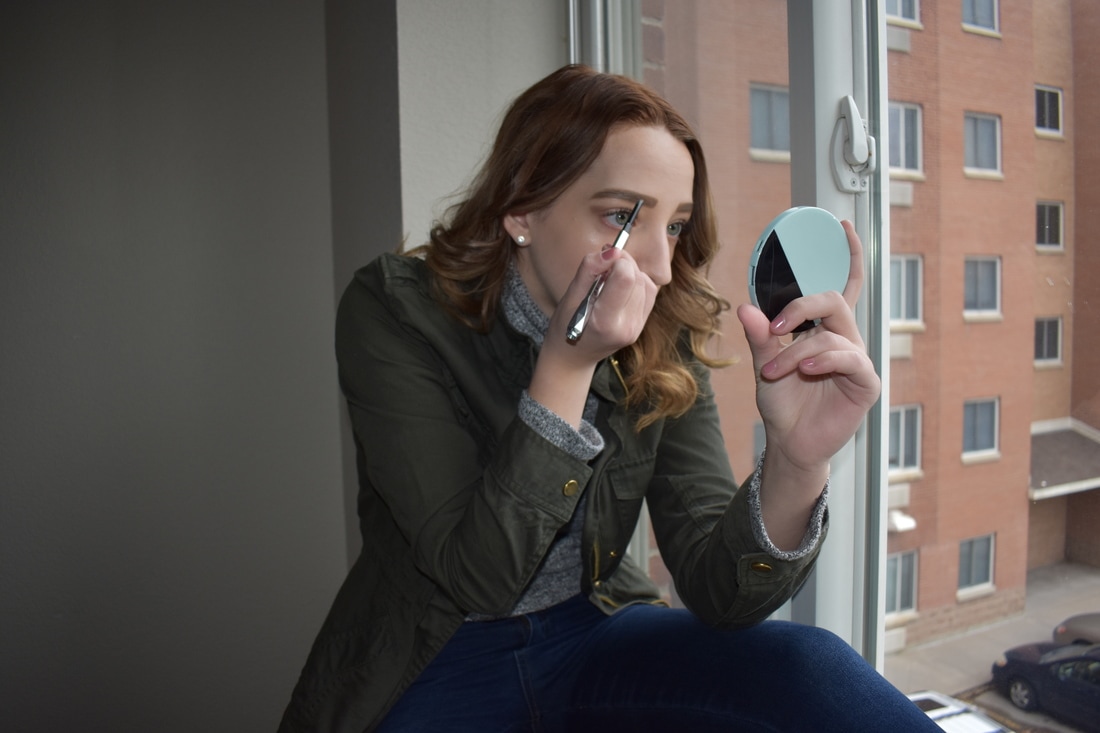
0 Comments
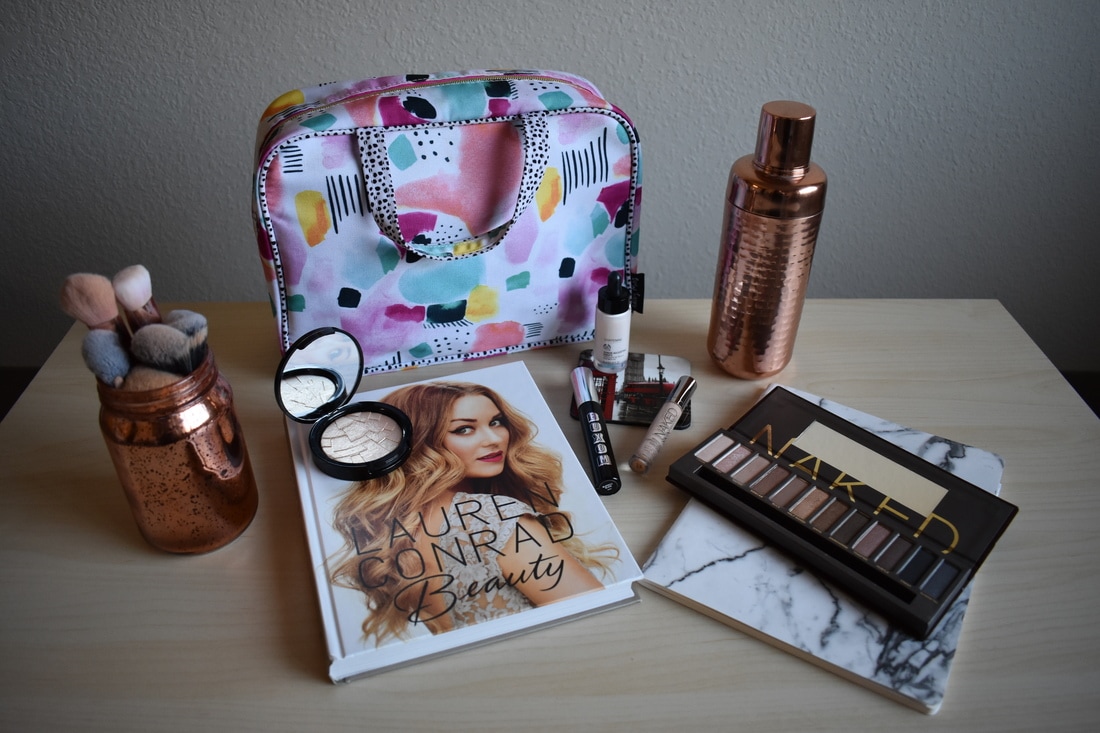 While the weather here in the Twin Cities hasn’t been consistently representing the spring season, it is now officially spring break season! If you have been having a stressful time with school, work, or just life in general, hopefully spring break gives you some time to decompress and relax from all the hustle and bustle of everyday life. If you’re headed off for warmer weather or just going on vacation elsewhere for spring break, I’ve got you covered with my top essentials for your getaway makeup bag! 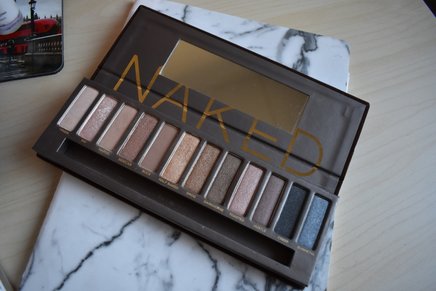  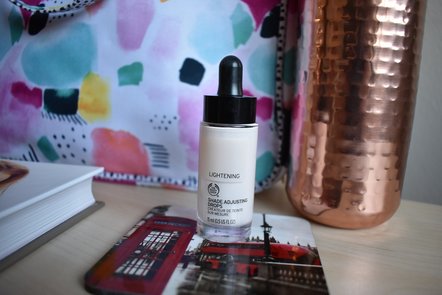 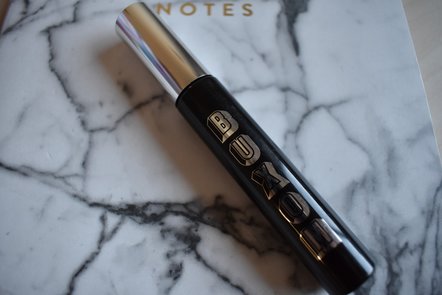 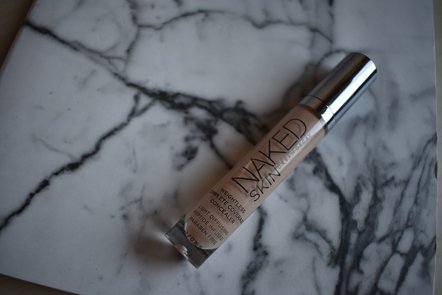
2. Universal Highlighter When I say a “universal highlighter,” I mean a highlighter that looks flattering on whatever skin tone you are at the current moment. For me, my winter paleness is still in full effect but whenever I go on vacation to somewhere warm I tend to develop a tan from being outside and also from lots of sunlight. That’s why I really recommend finding a highlighter that compliments your skin tone when you first go on spring break and for when you come back from vacation. My staple highlight for this occasion is Anastasia Beverly Hills So Hollywood Illuminator. It’s a beautiful light gold shade that works when I am at my most pale or tan. 3. Shade Adjusting Drops Like I mentioned above, my skin tone always changes when I go on vacation. When I know that my foundation won’t match my skin coloring, I use The Body Shop Shade Adjusting Drops, which comes in both dark and light shades. Just mix a few drops of this in your foundation and it will lighten your foundation or darken it to get your perfect skin color. (The one pictured above is the light shade since I used all of the dark shade last summer!) 4. Waterproof Mascara If you’re going to be at the beach or even if you’re just going to watch romantic comedies all night with your friends during this spring break, waterproof mascara is so necessary. Waterproof mascara is great for when you are going to be splashing around in the water all day or if you’re crying during the ending scene of a Nicholas Sparks movie. It will bleed less and you’re not as likely to have trails of mascara tears running down your face. My personal favorite that I have been using for years is the Buxom Lash Waterproof Mascara. 5. Concealer Not everyone wants to wear a full face of foundation on their skin, especially when you just want to relax during your spring break, that’s why concealer is your best friend. It’s great for hiding any redness or acne, but also for when you were up to late watching Netflix and you need to hide those dark under eye circles. Lately I have been using the Urban Decay Naked Skin Concealer, it’s super lightweight on the skin but it still gives great coverage. Spring break is a great week where you can just take a step back and take minute to relax but also have fun and not think about everything that might be causing you any anxiety or stress. Take some time for yourself to decompress and do something you enjoy with your family or friends. I hope you all enjoyed today’s post and have a fun, relaxing, and safe spring break! Ciao! Xo, Abby 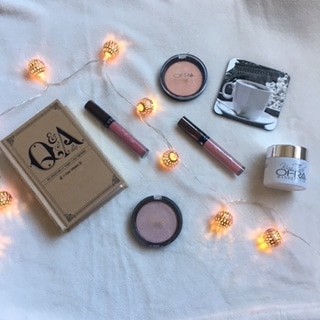 As much as I love exploring up and down the aisles of Sephora, there are some great beauty brands out in the world that aren’t retailed at places like Sephora or Ulta. Over the last year, I’ve been delving into the world of indie makeup brands and their products. For today’s post I’ll be talking about the internet famous brand, Ofra Cosmetics. Ofra Cosmetics has been making great strides in the beauty industry within the last year especially amongst social media influencers and their followers. With all the buzz surrounding this unique cosmetic brand, I decided to buy some of their products and try them out for myself. Here are my thoughts on the products I purchased and on Ofra Cosmetics as a whole! I have a normal to dry skin type, but during the winter my skin needs all the moisture it can get otherwise my face can feel as parched as the Sahara Desert. I had just run out of my current moisturizer, and I figured I would try the Ofra x Kim Thai Wanderlush Moisturizer. This product was created by social media influencer Kim Thai, and it caters to all skin types. The first thing I noticed when I opened this jar and tested the moisturizer on my hand was how lightweight it felt on my skin. It blended into my skin very easily and didn’t leave a greasy film or residue. Wanderlush is also fragrance free and contains both aloe vera gel and glycerin. The main thing that attracted me to this product is that it contains glycerin. For those that don’t know, glycerin is the main ingredient found in makeup primers because it allows any makeup applied on top to adhere to the skin and your makeup lasts all day. I’ve been using Wanderlush on my face before I apply my makeup in the morning, and I think it’s safe to say that this has become my new favorite daytime moisturizer. It’s so light on the skin but it still does a great job of hydrating my skin. As for making my makeup last longer, I do think it helps but I still use a primer on top of this moisturizer just to be sure that my makeup lasts all day. I definitely recommend this product if you’re looking for a great everyday moisturizer. Highlighters have been taking the beauty industry by storm in recent years. Applied to the cheekbones, highlighter gives the illusion of a healthy glow to the skin, and it is an essential step in my makeup routine. Honestly my highlighter collection is already to enormous, but I couldn’t resist picking up a couple from Ofra Cosmetics. The highlighters I chose from Ofra are You Dew You and You Glow Girl. As I swirled my fingers in these highlighting powders, I felt how soft the texture of this formula was. One swipe of these highlighters on the back of my hand deposits a sufficient amount of pigment. You Dew You is more of a warm toned champagne/gold color and You Glow Girl is on the opposite spectrum and is an icy pink with a slight purple undertone. They are both beautiful highlighters that give an ethereal glow without being too intense and I highly recommend them. Last but not least, I had to try out a few of the famous Ofra Cosmetics liquid lipsticks. I don’t really wear any other lip colors except pinks, mauves, and nudes so the two shades I chose are Aries and Charmed. Aries is a beautiful pink shade with a slight warmth of peach in it. Charmed is more of mauve with a bit of a purple undertone. These are very pigmented liquid lipsticks and I find that whatever product is on the applicator is all I need to fill in my lips. Both of these lip colors are very creamy in formula when you first apply them and like all liquid lipsticks they dry matte. The best part about the formula of these liquid lipsticks is that when they dry matte it’s not uncomfortable and extremely drying. I will no doubt be purchasing more of the Ofra Cosmetics liquid lipsticks from their vast collection of lip colors.
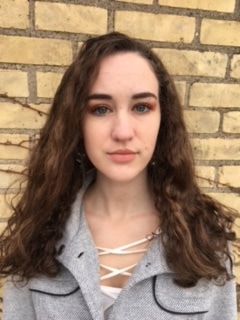
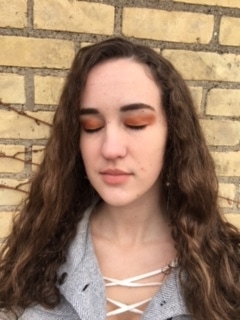
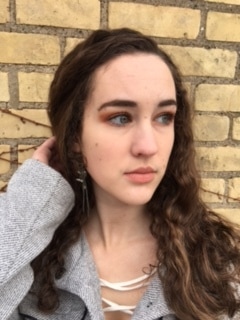
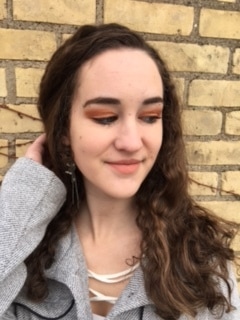
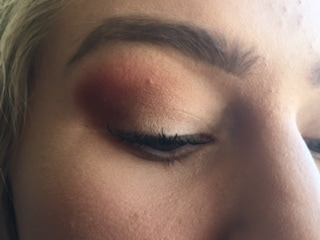
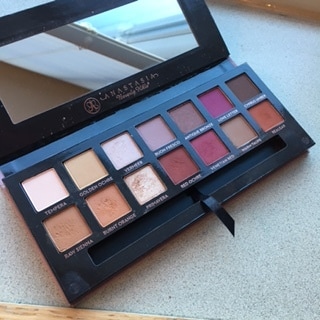
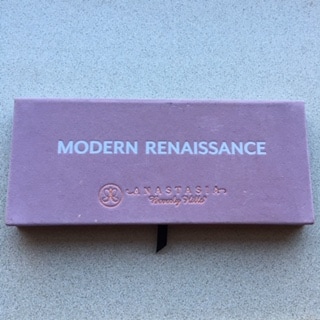
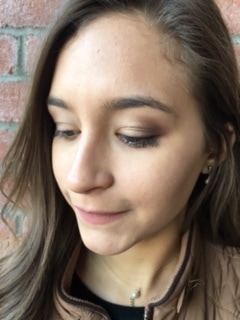
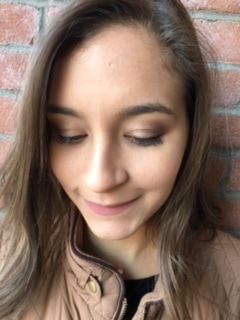
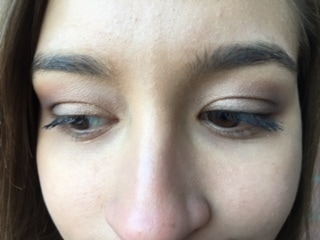
In my opinion, Ofra Cosmetics is a moderately priced cosmetic brand, while the prices of their products are not as affordable as drugstore makeup brands, the quality is significantly better and therefore it is worth spending a little more. I’m really impressed with Ofra Cosmetics and I will definitely be ordering more of their products in the future! Ciao! Xo, Abby Hello my lovelies! I hope all of you had a great Valentine’s day and spent it with your loved ones. I didn’t have a significant other to celebrate Valentine’s day with, but I did have another love that I got to spend time with on February 14th. Yes, I’m talking about my Anastasia Beverly Hills Modern Renaissance Palette. I’ve mentioned this palette in a previous post, but I honestly can’t get over how much I love this product! It was such a wise investment because it’s become my most used palette that I own. It might not sound like a big deal, but if you have met me personally then you probably know that I’m a huge makeup junkie. I have way more eyeshadow palettes than I care to admit, so to say that Modern Renaissance has become such a beloved item in my collection is pretty significant, at least to me. What I love about this palette is that it has classic warm brown tones in it, but it also has vibrant colors of red, pink, and even a beautiful burnt orange. So in honor of Valentine’s day, I decided to be a bit more daring with my eyeshadow and use those red and pink tones for my makeup look that day. Although Valentine’s day is over for this year, I figured I’d still post about the makeup I wore just to give any of you some inspiration for those who may want to experiment with these colors or if you want to recreate it for Valentine’s Day next year. 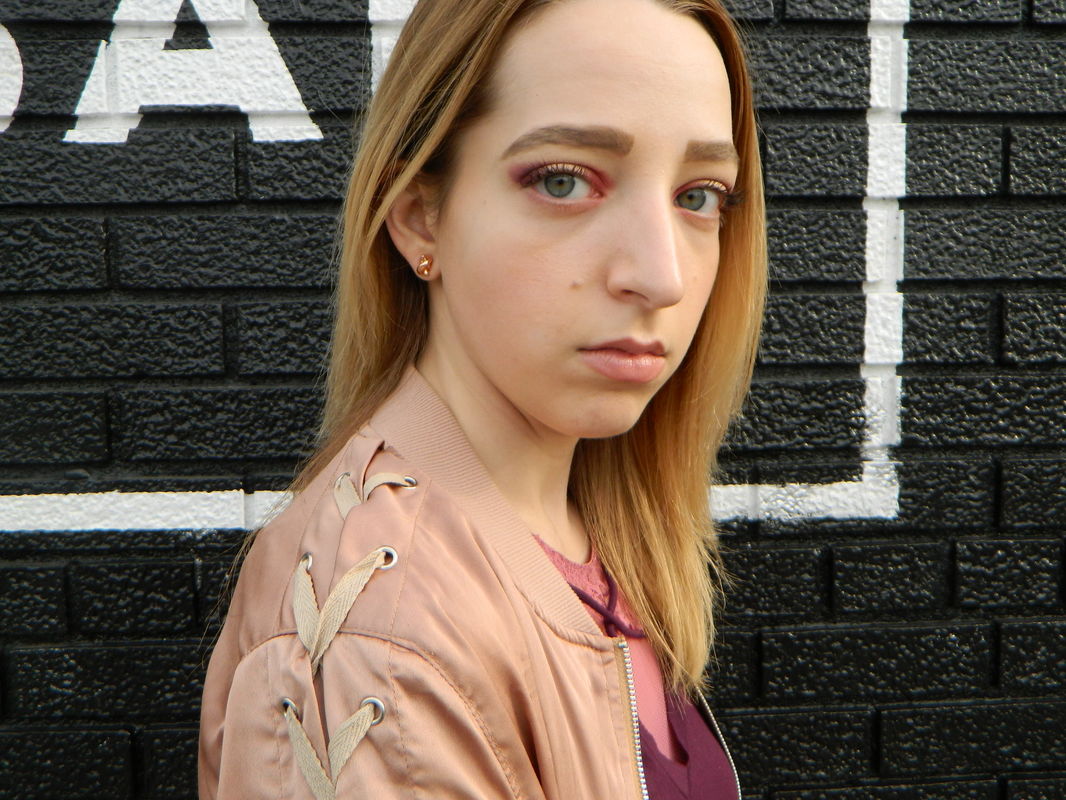 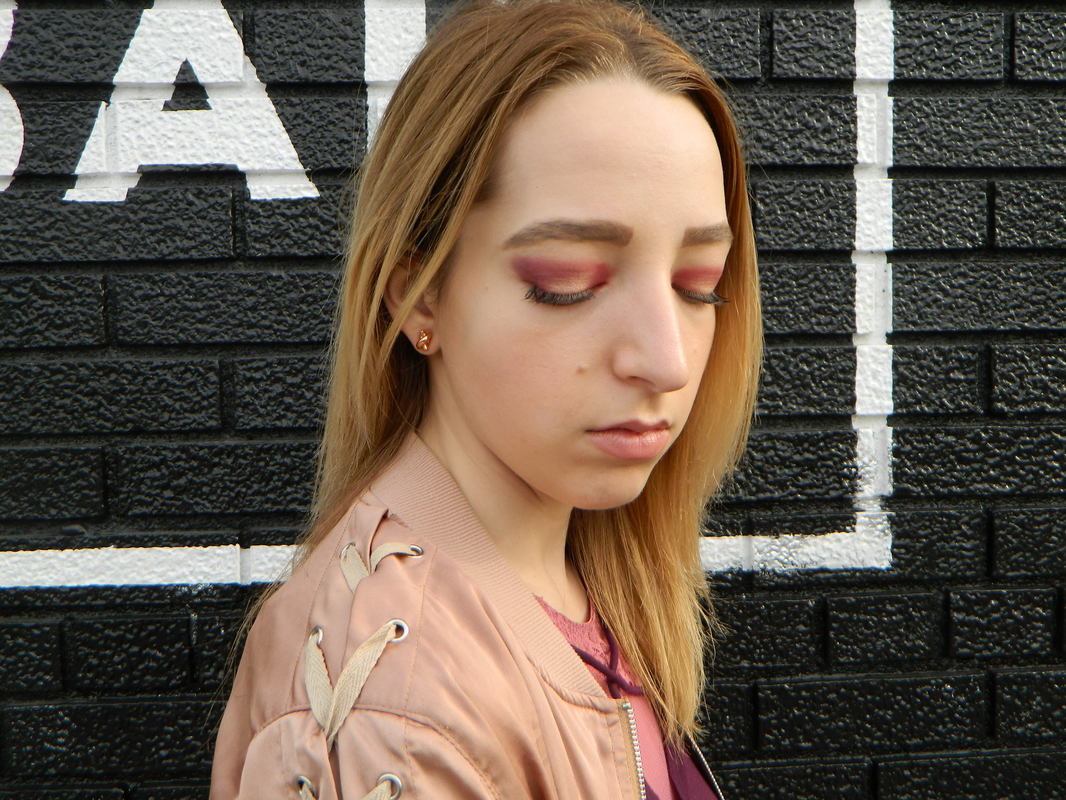 To create this pink and red toned Valentine’s Day makeup look, I only used 3 of the shades from this palette. For my crease I used the more magenta pink shade in the top row, called Love Letter (very appropriately named for this look). To start building some depth and add more of a red finish to the eyes, I used Venetian Red in the outer corner and the inner corner as well to really make the look dramatic. Since the colors in this palette are very pigmented, I had to use my blending brush a lot to clean up any harsh lines and to mix both Love Letter and Venetian Red together. For the center of the eyelid, I used my favorite shade in this palette, Primavera, to add some sparkle and complete the look. 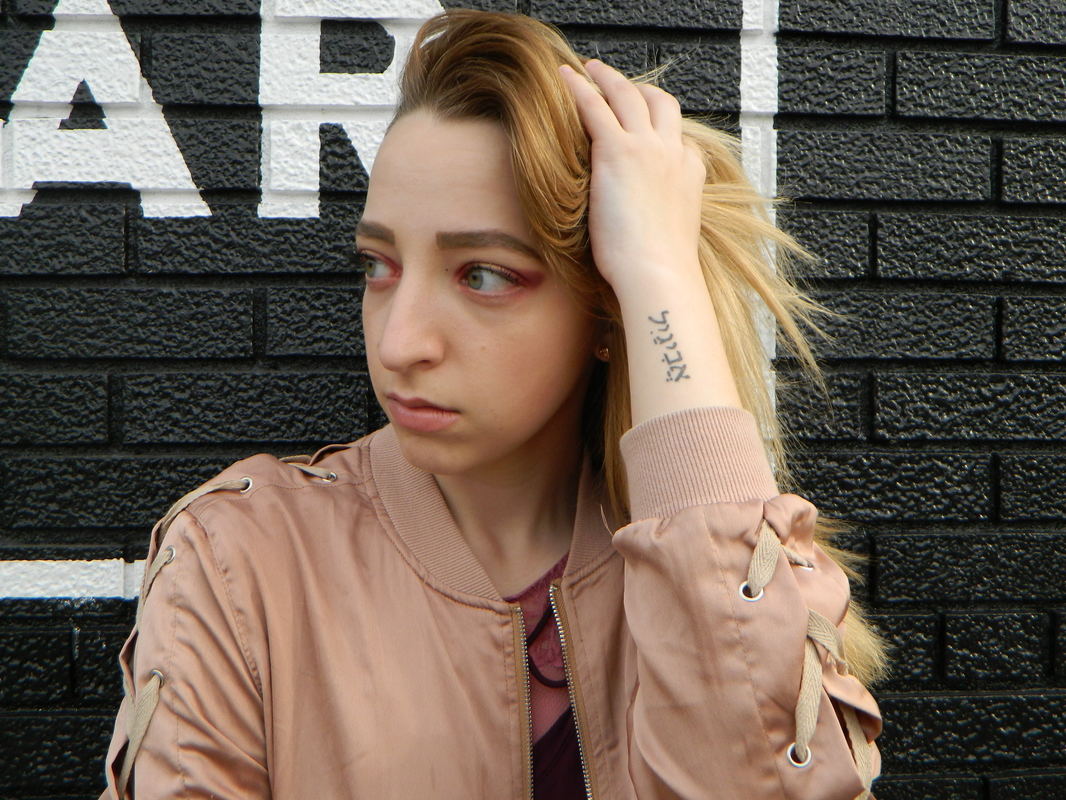 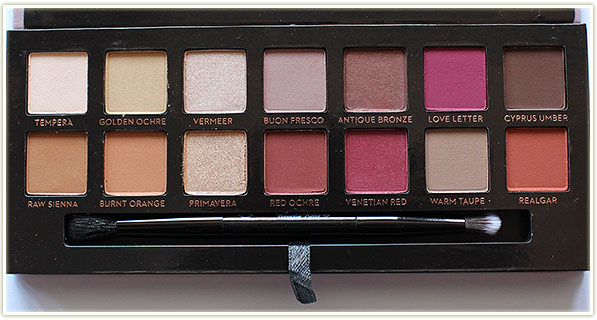  I want to thank my good friend, Ryan, for taking these amazing photos of me! I hope this post inspires all of you to get outside of your comfort zone with your makeup! Makeup is an art and there’s no right or wrong way to wear it. Dare to take a chance and do something different, not just with makeup but maybe even in your romantic life as well. Ciao!
Xo, Abby Everyone knows the feeling of when you walk into a makeup store and are so excited to see the endless amounts of beauty products. It’s easy to get sucked in and start grabbing items left and right, then before you know it you get to the register and your purchase rings up as $200. There are ways to avoid this situation and to also save money when it comes to buying beauty products, so today I’m going to share with you how to buy beauty on a budget.
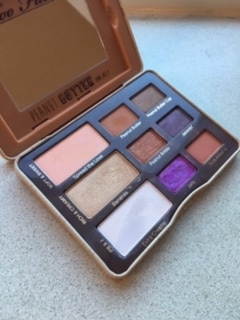
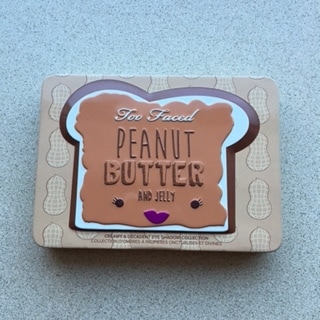
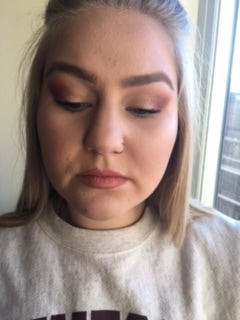
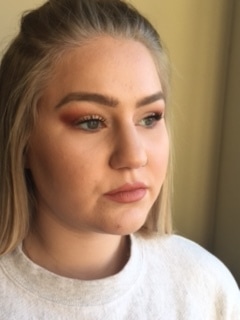
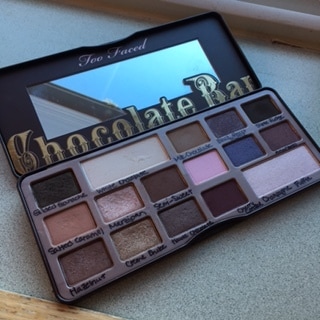
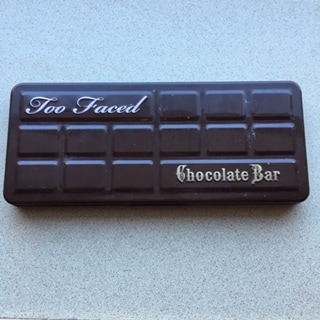
1) DO YOUR RESEARCH The best thing you can do for when you are buying beauty products is to do some research. Not everyone will have the same opinions about products and it’s a good idea to get different viewpoints about a specific product. If the product has very negative reviews then it’s probably a good idea to try something else and not waste your money on something that doesn’t work. 2) TRY IT BEFORE YOU BUY IT Typically when you go shopping in a store for an article of clothing, you try it on in the dressing room before you decide to buy it. With makeup, I recommend to try and get a sample before you take the plunge and buy the full size and to also test it out at home and not in the store itself. If you test the product in the store, the sales associates will try and persuade you to buy it right there and provide you with all of the product’s major selling points. If you test the sample outside of the store for at least a few hours, you can develop your own first impression of whether or not you will like the product and be sure that your money is being well spent. 3) DON’T GIVE INTO THE HYPE Makeup brands launch new products throughout the year, and they advertise their latest products through social media influencers. When a large group of influencers rave about a new product that has launched, this creates an enormous demand around the product itself. This demand is called “the hype.” It’s so easy to be drawn in and want to buy into the latest trend, but the best thing you should do is wait. In time, the demand for these products will go down and become more easily accessible. Also more information will be available regarding these products and the prices are more likely to go down. 4) ONLY BUY WHAT YOU NEED & USE UP WHAT YOU HAVE This is an essential rule for if you want to save money on makeup. My first recommendation, is to lay out your entire collection and look through what you have. Identify the essential items you need and the items you have a surplus of. When it comes to the essential items, use ALL of the product before repurchasing an item of that type, then you can reward yourself and buy something new. Before you go makeup shopping, write out a list on a piece of paper or on your phone of everything you intend to buy that day. Do not deviate from your list and do not browse the aisles. 5) ADD TO CART, THEN LEAVE IT Not everyone has the convenience of an Ulta or Sephora locally, that’s where shopping for makeup online comes in. It can be just as tempting to add multiple items to your cart as it is buying makeup in a physical store. The advice used above about creating a list when makeup shopping still applies. Add all the items you are thinking of purchasing to your cart but don’t check out immediately. Instead, let the items wait in your browser for a day or so. Review your cart later and prioritize according to your budget, your needs, and the product’s availability. 6) DON’T FORGET TO COUPON An easy and simple way to get coupons is to join a loyalty program for a cosmetics retailer. Many of your purchases earn an accumulation of points which can earn you discounts on any future purchases. These reward programs also give you early access to any sales promotions. Another possible method of couponing is through affiliate codes. Many cosmetic brands partner with popular social media influencers to provide discount codes, which the influencers make a commission on. These affiliate codes are available on the influencer’s different social platforms. 7) AVOID THE AISLE OF DOOM Cosmetics retailers often set up aisles of miniature products near the checkout. This is what I like to call the “aisle of doom.” As you wait in line, your eyes might wander and be tempted to buy these mini products. It’s a marketing tool to get you to buy more products that you don’t need. If the store has an alternative checkout, use it to avoid the dreaded aisle of doom and save yourself some money. Whether you are just getting started in makeup or you are a college student trying to save money for the future, I hope you found this post informative! I’ve had to learn some of these tips through lots of trial and error, but hopefully I helped save you money on your next makeup shopping excursion. Ciao! Xo, Abby. When it comes to my makeup routine, I tend to stick to what I know works for me, but eyeshadow is the one area in makeup that I love to experiment in. I love working with different types of shades and creating looks that can go from simple and classic to dramatic and eye-catching. I was always the girl who did my friends’ makeup for prom, photoshoots, or just for some fun! Over the years I’ve come to know what are some of the most flattering eyeshadow looks for different eye colors. So today, I’m going to share my favorite eyeshadow colors to use on blue, green, and brown eyes. Some of my friends will be featured as models for this post and I will also be giving palette recommendations in case any of you want to recreate these looks. Blue EyesFor all you blue-eyed beauties out there, one of the best color schemes to use that to make the blue in your irises pop is orange. I know orange is an intimidating color to experiment with, but it doesn’t have to be the bright neon orange of which you might be thinking. When it comes to using this color scheme, I suggest that you veer more in the direction of the peach family for something soft and feminine. If you want something much more dramatic go for a burnt orange and copper look. These orange tones really give blue eyes a much more vibrant appearance. 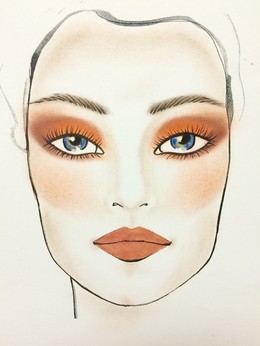 This is the face chart that I used as inspiration for the makeup look that I created for blue eyes! To create this look on my gorgeous friend, Andrea, I used the Too Faced Peanut Butter and Jelly Palette. Andrea has various shades of blue in her irises that make her eye color very unique, almost like a watercolor painting. I decided to go for the more dramatic burnt orange eyeshadow look to bring out the cornflower blue tones in her eyes. I started building the look with Too Faced’s iconic shade, Peanut Butter, in the crease, and added a bit of Nuts About U in the outer corner. I mixed both of the shades Peanut Brittle and Bananas for the eyelid color, and added a light dusting of Peanut Butter on the lower lashline. One thing I will definitely say when it comes to looks like these, is that it’s very easy for it to appear harsh and too concentrated so my advice is to blend a lot. The blending brush is your best friend and it will help create a more cohesive eyeshadow effect! Green EyesTo all my fellow green-eyed lovelies, a universally flattering shade to really enhance your distinct eye color is a shade in the red-plum family. I, myself, have green eyes and personally am a huge fan of burgundy tones because they are so eye-catching and daring, but they are still a more subtle pop of color. If using burgundy on your eyes is intimidating, a great way to make the eyeshadow appear more natural is to add some warm brown tones in the crease to create a more everyday look that isn’t as dramatic. I strongly recommend that when you are shopping for a good makeup palette, get one that has shades that can be used for a look that you might wear just on a day-to-day basis, but also has shades that can add some drama for a night out with your friends. 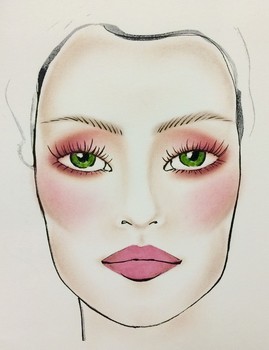 This is the face chart I used to create my eyeshadow look for all you gorgeous green-eyed beauties! When I was thinking of who should model for the green eyes look, I couldn’t think of anyone better than my friend, Lauren. She’s such a sweet and kind person, and I love how luminous her green eyes are when she’s laughing and having a good time. To create this particular look I decided to use my holy grail eyeshadow palette of the moment, Anastasia Beverly Hills Modern Renaissance Palette. While I wanted to keep the look somewhat casual, I also wanted that element of drama to really amp up the eyeshadow look as a whole. I started with adding some depth to Lauren’s eye shape by developing the crease and using a mixture of Raw Sienna and Burnt Orange from the palette. I lightly tapped my brush into Realgar to intensify the outer corner, and added a touch of the shade that inspired this whole look, Red Ochre, to the end of the crease and also the outer corner. I then used a mixture of Primavera and Vermeer on the eyelid itself to create a gradient between the burgundy-brown tones in the crease and the eyelid. Something to keep in mind with such a pigmented palette like this one, is that it will have some fall out. Pigmentation is such a crucial factor in the process of developing cosmetics, because without it the color will not show up when applied. Some shadows are so pigmented that they will have some fall out, but if you tap off the excess product when applying your eyeshadow then there will be less fall out. Brown EyesAlthough a number of people you may know have brown eyes, that doesn’t mean that they are all the same shade. Much like the other eye colors mentioned in this post, there are very different tones for brown eyes but they can all be accentuated by using similar color schemes. When working with brown eyes, I tend to use eyeshadow shades with a deep gold color for the eyelid and a smoky dark brown and olive green combination for the crease. Gold is one of the most popular metallic shades to use on the eyelid and since it is a warm tone, like the color brown, it really creates a captivating look for the wearer. These colors may seem ordinary at times, but using different finishes for each shade will definitely brighten the beautiful brown eyes you have. 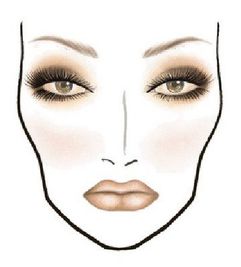 I drew inspiration for the look I created for brown eyes using this face chart. I didn’t do an exact replication of this sultry makeup look, and instead opted for something I found to be more appropriate for everyday, but the foundation for the look I created is still very similar to this sketch. I knew from the beginning while writing this post that I wanted to ask my friend, Sabrina, to be my brown eyed model. Sabrina is a very simple girl when it comes to her eye makeup, but I wanted to show her that you can use basic colors and still achieve a very stunning and effortless makeup look. To create her smoky bronze and gold eye, I used the Too Faced Chocolate Bar Palette. I used a combination of the matte colors Milk Chocolate and Semi-Sweet to darken up the crease. I tapped a small amount of the brown/dark olive green color, Gilded Ganache, in the outer corner to add that bit of sultriness that I wanted to incorporate. Lastly for her eyelid I used Creme Brulee, a vibrant yellow-based gold shimmer, to add that hint of sparkle.
I want to give a huge thank you to my models, Andrea, Lauren, and Sabrina! I hope all of you enjoyed my first post. Ciao! Xo, Abby By Annie HeilI am writing today to inform you that this will officially be my last blog post for TWIN. L I am off to study abroad in Florence, Italy in about a month and at that time another FABulous beauty blogger will take over my page on our blog.
That being said, I have thoroughly enjoyed writing for TWIN this past year and it is very bittersweet to officially say “goodbye”! The people I have met, things I have learned, and opportunities this blog has given me are something I will never forget and I have truly enjoyed sharing my beauty tips & tricks with all of you. At the very least, I hope my posts have provided you with some entertainment and you enjoyed reading them as much as I enjoyed writing them. If you’ve read any of my posts before you know I’m a sucker for a good quote so it’s only fitting I leave you with one last one before I go! After all, in the wise words of Dr.Suess “Don’t cry because it’s over, smile because it happened.” :) Ciao & Xo, Annie By Annie Heil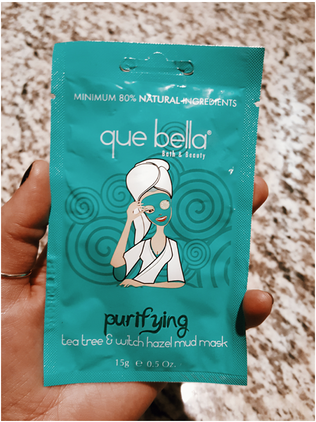 Back when I was in high school, my mom used to always tell me about an ongoing joke between her and her friends that you cannot come out of Target without spending at least $100 dollars. I used to laugh at this back then, thinking “oh that’s just mom talk” but now being the stereotypical broke college student that I am who frequently shops at Target I realize this joke isn’t so much a joke after all. It is a reality! Target has got to be the easiest store to get lost in and every time I go there I ALWAYS find myself wandering over to the hair and beauty isles. It really puts my self-control to the test and although I usually do a good job at walking away from these isles without picking anything up, I just couldn’t resist myself when I came across the Que Bella facemasks. 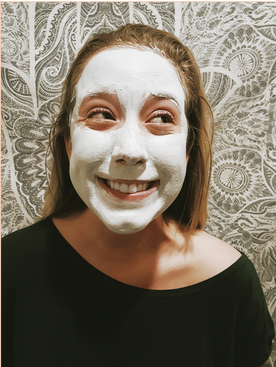 Retailing for about $2.00-$3.00 depending on the kind you get, these face mask packets are hard to pass up with the price so right. I was shopping with my friend at the time, who is a huge fan of Que Bella, and she suggested I try the “Purifying Tea Tree & Witch Hazel Mud Mask” because I have been breaking out recently. Excited to pamper myself, I ended up using the facemask that night after I took a shower and let me tell you, it was AH-mazing. I will say, however, when I first opened the packet the smell of the mask was extremely strong. It was nothing too crazy though and personally I enjoyed the smell because it was very earthy and forest like. The consistency of the mask was thick, luxurious and somewhat cool to the touch. The directions on the back of the packet instructed to apply the mask liberally so I took a good amount and applied about three-four thin layers with my fingers all over my face until the mask was thick and even. Next, I relaxed for 15 minutes and waited for the mask worked its magic. 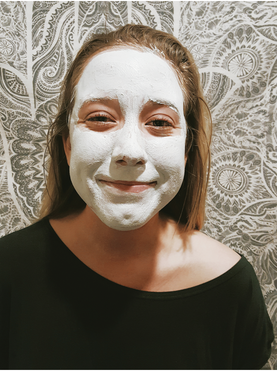 At first, the mask sort of burned! Leaving my skin a little tingly I assumed it was because I had just hopped out of the shower so my pores were open and sensitive. I noticed, however, that the burning sensation was primarily on my nose and t-zone, which is a hot spot for my blackheads and blemishes! After about 30 seconds the burning sensation went away though and mask dried up nicely for the remainder of the 15 minutes.
Once the mask was done drying, I removed it by wetting a washcloth with hot water and pressing it onto areas of my face before wiping away the mask. (Tip: After you completely remove the mask, wet your washcloth again with COLD water and run that over your face to close your pores. Hot water opens pores and cold water closes them so it’s important to close them before applying moisturizer so you don’t put bacteria back into the pores you just cleaned!) Because mud masks are so thick and I applied probably a little more of the mask that I needed too, I found this was the most efficient way to take it off. It left my skin feeling detoxed, clean and smooth and I can honestly say I’m excited to use this mask again! Initially, I thought I was only going to get one use out of the packet but given this mask is so thick and they give you 0.5 oz. of it I even had some left over for another time. J Bottom line, I HIGHLY recommend the Tea Tree & Witch Hazel Mud Mask by Que Bella. I already noticed a difference in my skin when I woke up the next morning and for $2.00 a packet, you can’t really go wrong! So next time you need a little pick up, head to Target and grab a Que Bella facemask. I promise your skin (and bank account) will thank you! Xo, Annie By Annie Heil PC: Anne Paoletti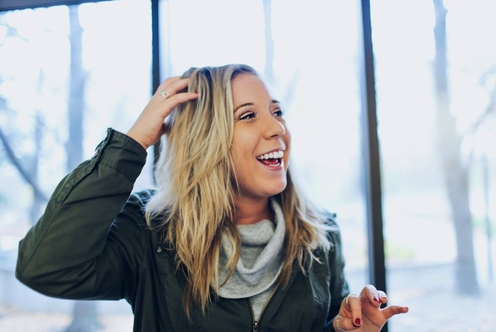 It might sound a little strange but when it comes to my hair, I actually prefer how it looks on the second day of not washing it. Now I know, I know to some people this might sound absurd and you can’t even imagine going a day without shampooing and conditioning your luscious locks but a lot of experts actually recommend not washing your hair everyday. In fact, it is very nourishing to let your scalp breathe and allow the natural scalp oils to work their magic. If you can get away with it, going two to three days without washing is actually extremely beneficial for the health of your hair. This is because your scalp oils have a naturally protective quality that resembles the benefits of conditioner. In other words, these oils are nature’s conditioner! Okay, so how do you get a freshly washed hair texture when you haven’t washed your hair in a coupe of days? Well, look no further than the blog post below where I share with you exactly how I keep my hair grease free. Over the years, I have developed a few key tips and tricks I keep up my sleeve for the days when my hair looks and feels “blah” and so far, so good! Tip #1: Try to touch your hair as LEAST as possible! I know this can get really hard, especially if you have a habit of playing and touching your hair 24/7 but every time you touch your hair the oils from your hands get transferred onto it. Aka, the more you touch it the greaser and oilier it is going to get! So try your very best to keep those hands at bay and you’ll be able to get away with washing your hair a lot less. 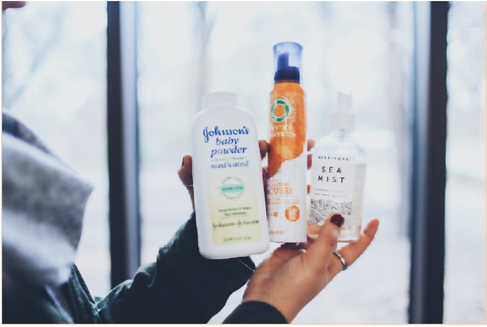 Trick #1: Use baby powder (or dry shampoo) at night and sleep with your hair up in a loose topknot. When you apply baby powder on your hair at night before you go to bed, you allow the powder to sit on your roots and soak up all of the second day grease and oils as you sleep. In addition, throwing your hair up in a topknot and wearing it while you sleep adds a significant amount of volume and lift into your hair, effortlessly. This means when you wake up your hair will have a blowout texture instead of being flat and sticking to your head. 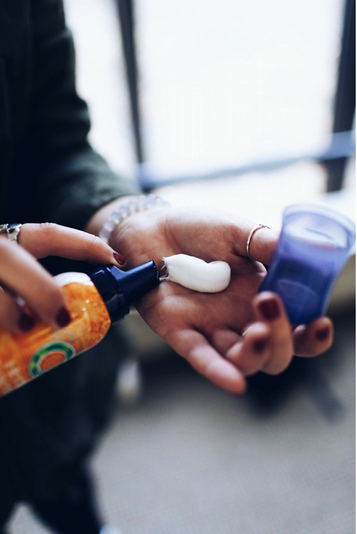 Trick #2: Add a volumizing mousse and scrunch your hair in the a.m. to reactivate texture. After you take out your topknot, take a little bit of texturizing mousse and scrunch it into the ends of your hair. Depending on the thickness of your hair, make sure you are using the lease amount of mousse possible to get the job done! In other words, if your hair is very fine use about a penny size amount of product and if your hair is super thick use a quarter size amount. This will ensure the mousse doesn’t overpower you hairs natural texture and prevent it from looking greasy and stiff. Tip #2: Curl a couple pieces in the front for extra volume and to frame the face. This step is completely optional but some days when I am really just not feeling my hair I will grab my curling wand a curl a couple of pieces of hair in the front to frame my face. However, the key here is to make sure the curls are not tight. The looser and “beachier” you can make the curls the better. You achieve this by curling away from your face and only holding your hair on the wand for about 3-5 seconds. 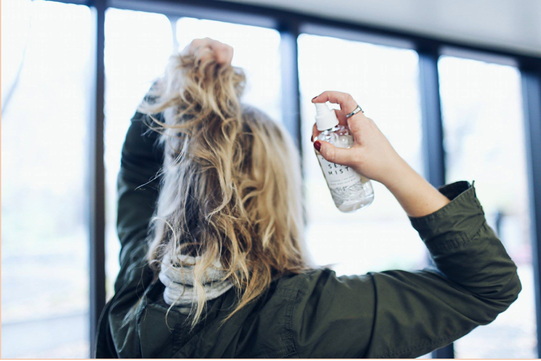 Trick #3: Spritz Sea Salt (or texturizing) spray all over your hair to finish it off & tease if desired. To finish everything off take your favorite texturizing spray and spritz it all over your hair. My personal favorite is Herbivore’s Sea Mist Texturizing Salt Spray/Lavender because it emphasizes the natural wavy texture of my hair and smells AH-mazing. An optional final step would be to take a rattail comb and tease a couple of pieces at the crown. Just remember to be very gentle because being too rough with the comb or too much teasing can really damage your hair. 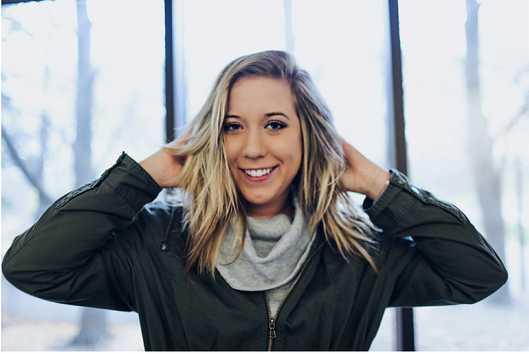  And then you’re done! Perfect second (or third, or fourth) day hair that will have everyone thinking the only reason your hair looks so good is because you wash it everyday. Enjoy your new “do”! :) Xo, Annie By Annie Heil PC: Anne Paoletti Ombre hair, ombre nails, ombre eye shadow, and now....ombre lips?! This beauty trend is never-ending! And personally, I am completely okay with that. Unlike dying your hair ombre or painting your nails ombre, creating the perfect ombre lip is EXTREMELY easy. I’m talking outrageously easy, people who have never touched a tube of lipstick before easy and that’s exactly why I’m obsessed with it. All you need is two different shades of lipstick, one dark and one light, and a couple minutes of your time! So, lets get started. :) 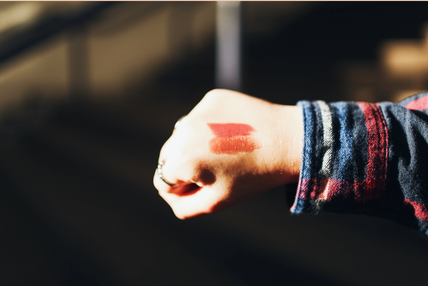 For my particular lip look, I wanted to use lip shades that would be appropriate for everyday wear and not look too bold or overpowering on my lips. I decided to go with two neutral and muted colors, Revlon’s ColorBurst Matte Balm in “Sultry” and Estee Lauder’s Pure Color Long Lasting Lipstick in “Sugar Honey” #83, as a result. In the picture above I swatched both colors on my hand, “Sultry” is on top and “Sugar Honey” is the bottom color. Keep in mind, however, you do not HAVE to use the same exact colors I did! For a more daring lip look, I think a dark cherry burgundy combined with brighter red color would look very sharp. Have fun with it! This tutorial can be mixed and matched with any kind of lip product your heart desires. In fact, I encourage you to not run out to the store and buy new shades of lipstick because I guarantee you already own two shades that work perfectly together! Simply swatch a bunch of combinations on your hand until you find one you like (that’s what I did)! 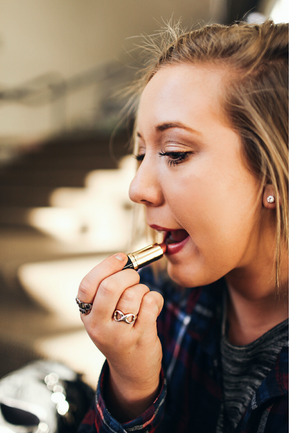 After you have picked two colors, begin by outlining your lips with the darker shade (in my case Revlon’s “Sultry”) and slightly bring the color in to the center of your lips without completely covering your lips. Next, take your lighter shade (in my case Estee Lauder’s “Sugar Honey”) and apply it to the center of your lips and the areas you have not applied the darker shade. Carefully blend the two colors together by lightly smacking your lips together not rubbing! Rubbing your lips together too hard will cause the colors to completely blend together and take away the ombre, two-toned effect. An optional final step would be to take your favorite shimmery or shiny lip-gloss and applying a very small amount to the very center of you top and bottom lip. This gives the illusion of fuller, bigger lips without getting injections. You’re welcome.   Happy ombre-ing! :) Xo, Annie |
Meet Abby!Abby is a passionate and fashion forward Twin Cities native majoring in Retail Merchandising here at the University of Minnesota. She loves to capture the beautiful small moments in life with her camera. You’ll probably find Abby sipping on a latte whilst adventuring in the city or curled up in bed with a good book! Check her out on the "beauty" section of Twin! Categories
All
|